TaskMail is a free online project manager for teams to create projects, invite team members, collaborate on projects, create & assign tasks, etc. You can create unlimited projects and invite as many team members as you want into the projects. In each project, you can create multiple tasks (with files like images, documents, etc) and assign them to specific team members. Unlike other online project managers such as Slenke, WunderKit, and Teamplifier, this one allows you to assign & discuss bugs, designs, ideas, notes, questions, and more as tasks with your team members.
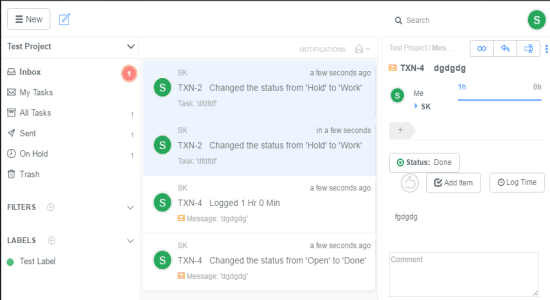
The interface of TaskMail is quite similar to some of the email clients with labels on the left and shows all the projects, team members, and tasks related activities as notifications in your inbox. You can also create labels to organize your projects and tasks in a better way. Additionally, it offers 20GB of file storage for each project or team, create smart filters for tasks, export project data as JSON files, auto data backups, etc.
How to Create Projects and Invite Team members:
Step 1: To get started, go to the homepage of this online project manager and sign up. After that, you will see an email client like interface with labels like Inbox, Trash, Sent, and more on the left and notification section on the right.

Step 2: Click the hamburger button at the top corner and select the option “Project” to create a new TaskMail project. Enter your project name, project description, task prefix id, and hit the “Create Project” button.

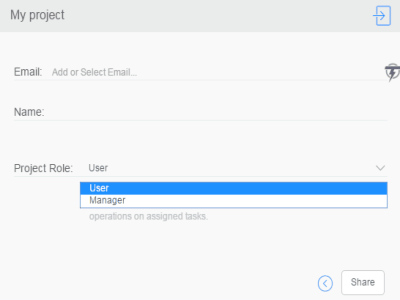
Step 3: When you’re done with creating a project, click the drop-down menu above the Inbox label and select the “Share” button associated with any project to invite team members. To invite any user, simply enter the email address, user’s name, set role permission either as a user or a manager and then click the share button.
How to Create Tasks and Assign them to Team Members:
Step 1: To create a task, click the “Note” icon adjacent to the hamburger button at the top. After that, all you need to do is enter the task title, choose the team members to assign the task, set a due date, and estimate duration. You can also put the task on hold and share files like images, documents, etc.
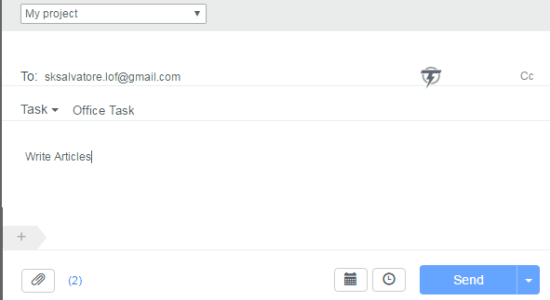
Step 2: It allows you to select a single primary team member for assigning the task, but you can also Cc as many team members as you want for a particular task. To put a task on hold, click the arrow icon associated with the “Send” button and select the option “Put On Hold”. You can click the “Attachment” icon at the bottom to insert files like images, documents, and more.
Step 3: Another great feature is that you can discuss ideas, bugs, designs, and more as tasks such that your team members can easily understand the issue for which you’re assigning the tasks to them. While creating a task, click the arrow in the task title field and select any of the available subjects for your task.

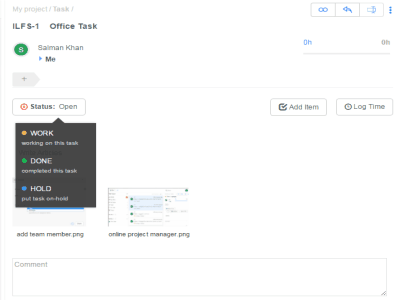
Step 4: The team members will see all the assigned task in notification section of their individual accounts. They can simply browse the task, add new to-do items, change the status of the task, add comments, add log time, etc. as shown below.
How to View Inbox Notifications:
Step 1: The interface of TaskMail is quite similar to your usual email clients. You will see labels like Inbox, My Tasks, All Tasks, Sent, On Hold, and Trash on the left of the screen. On the right, you will see two panels, one with notifications (project, team member, and task activities), and another one to view the activities or notifications.
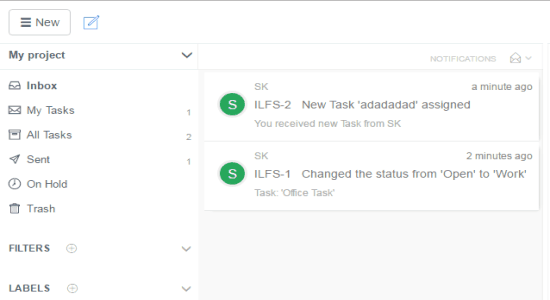
Step 2: Click on any of the notifications to view it and it will open up in the same window same as Outlook. That means you can check the task progress, comments by team members, etc. without even leaving the inbox.
How to Create Smart Filters and New Labels:
Step 1: You can choose various smart filters for sorting the tasks as per your need. Let’s say you want to find out the tasks which are due for the current week, then instead of scrolling through all the tasks, you can simply pick a filter for that.
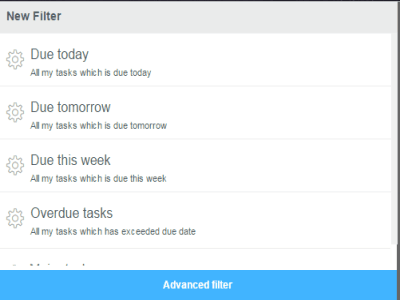
Step 2: Click the “Filters” option below the labels on the left to select a filter. There are dozens of default filters available, such as due today, due tomorrow, due this week, overdue tasks, recently assigned, etc. If you want to create you own custom filter, then simply select the “Advanced Filter” option.
Step 3: Another useful feature of TaskMail is that it allows you to create new labels for organizing your tasks. Simply click the “Labels” option below the “Filters” option, type a label name, and choose a label color to create a new label.
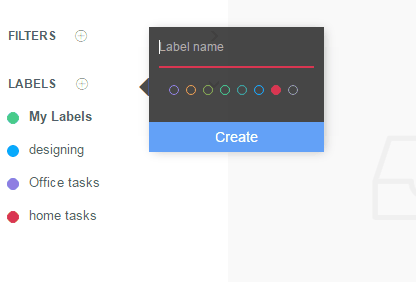
Step 4: While creating a task, you can also add it to any of the created labels such that you can find it later with ease. You can create different labels for specific types of tasks and browse them in the respective labels.
My Final Verdict:
TaskMail is a useful online application to create projects, invite team members, add tasks, assign tasks, view notifications as emails, etc. You can add multiple tasks to a single project and assign them to different team members. While creating a task, you can also insert various files like images, documents, etc. If you’re looking for a simple online application to create and assign tasks to team members, then check out TaskMail.