Out of the diverse array of incredible features that Windows 10 comes with, Cortana can easily be considered not only the most powerful, but also the most fun. The witty digital assistant makes it super easy to find files, schedule and track appointments, and do a lot more. However, even more amazing is the fact that you can customize the digital information served up by Cortana, based on your personal interests.
That’s right. So whether you want to know the breaking news, catch up on the latest in entertainment industry, or anything else; just specify your interests, and Cortana will have that information for you. All set to make the incredible personal digital assistant even more fun? Jump over to the other side of the break, and find out how you can personalize content served by Cortana based on interests in Windows 10.

How To Personalize Content Served By Cortana Based On Interests In Windows 10?
It’s pretty easy to customize the digital information served by Cortana, based on your personal interests. From daily weather forecast to breaking news, and from the latest movies to the newest in sports, there’s a ton of stuff that you can specify in your interests, and Cortana will automatically serve content based on that. In any case, the step by step tutorial detailed below should be more than sufficient to get things rolling off to a smooth start. Read on:
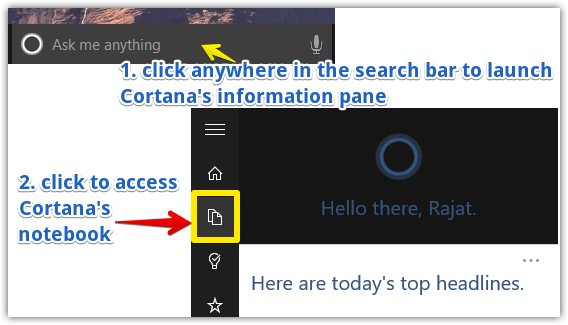
Step 1: Click anywhere in the search bar to bring up Cortana’s vertical information pane. Once it’s up and running, click the third icon from the top (the one that looks like two stacked pages) to access Cortana’s Notebook.

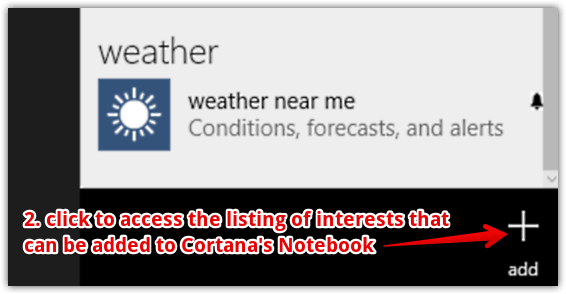
Step 2: The Notebook is the sub-section where Cortana keeps a record of all the user-specified interests, in order to serve personalized content. And this includes everything from daily headlines to current weather conditions. Click the “plus” icon at the bottom right corner to add more interests.

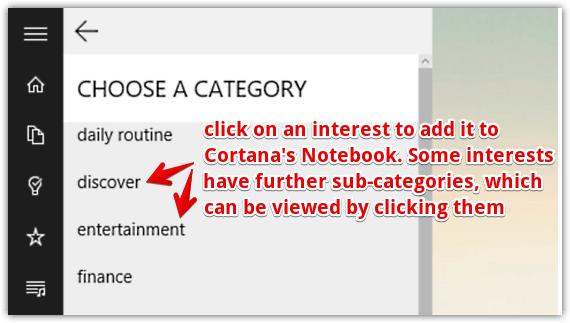
Step 3: Almost done. You should now see a listing of interests, divided into numerous categories such as entertainment, finance, sports and travel. To add an interest to Cortana’s content suggestion sources, simply click on it. Some interests have further sub-categories, which can be viewed by clicking them. Here’s a screenshot:

And we’re done. You can similarly add other interests as well, and Cortana will automatically serve up content based on them. Pretty awesome, don’t you think?
Do Check Out: How To Configure Text To Speech Settings In Windows 10
Wrap
Cortana is undoubtedly one of the most impressive features of Windows 10. And extensive personalization options, as explained above, just sweeten the pot a lot more. Try this thing out, and shout out your thoughts in the comments section below.