Perspective Image Correction is, as the name of the application pretty much says for itself, a photo perspective correction software which you can use in order to easily perform corrections to the perspective of objects in your images. By objects we mean anything and everything, buildings, cars, every photo or image can have its perspective changed alongside parameters that you set.
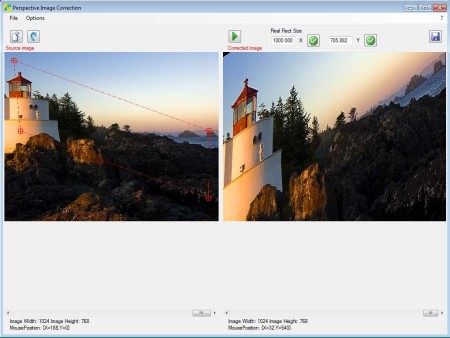
In the image above you can see the interface of this Perspective Image Correction. As you can see it’s pretty simple, without any kind of complicated menus. The left side is where the image whose perspective you want to adjust or change will be loaded, and on the right the processed image will be shown. Small toolbars are available above each one of these, and in the top left menu you have the classic main menu.
Key Features of this Free Photo Perspective Correction software:
- Good format support, works with all the common images like JPEG, PNG.
- Simple to use, you just need to create 4 point enclosed area.
- Manually adjustable stretch size both vertical and horizontal.
- Change the rotation of converted images, flip, and more.
- Filters like morphology, smoothing, threshold, gradients, edges.
- Resize with and without scaling, adjust gamma, histogram, etc.
Perspective effect can usually be seen on sports cars, you’ve probably seen an image or two where the image setup warped and distorted in order to create a perspective effect. Now with Perspective Image Correction you can do it yourself, without using expensive commercial image editing applications and without having to have a lot of experience. Here are few tips to help you get started.
How to Correct and Adjust Image Perspective with Perspective Image Correction?
First step is to open up the source image whose perspective you want to change and correct. To do this click on File >> Load source image, or you can simply click on the Open file icon. 
To change, modify or correct the perspective of an image you’re gonna have to outline the shift in the perspective that you want to create. Do this by left clicking on the source image and pinpointing the outlines of the shift, that would be the red shape which you can see on the left image. Size and perspective of this shape determine the change of the perspective, or its correction which will be applied right away on the right image. To change any of the other options that we mentioned, like resize, transform, rotation, color correction, select Options from the menu at the top to access them. When you’re done, hit Save.
Conclusion:
Perspective Image Correction does a very good job. Don’t judge it from the example that we made above. There’s a lot more to it. With the options that it has to offer you can correct images whose perspective was messed up when they were taken. Of course, if you want, you can also create a perspective effect. It’s very easy and most importantly free, give it a try. Free download.
You may also try Paint.NET, Inkscape, and GIMP reviewed by us.
