VirtualSpace is a free Virtual Desktop manager for Windows 11. It lets you create, move, swap, and switch between virtual desktops using smooth animation and keyboard shortcuts. With this, you can even move specific applications from one desktop to another very quickly. Basically, this is enhanced version of the native virtual desktop that ships with Windows.
VirtualSpace works in both; Windows 10 as well as Windows 11. But in this post, I will explain its functionality on a Windows 11 PC. It runs in portable mode and you just have to launch it one. After that, you call it anytime using keyboard shortcuts and then manage all the virtual desktops and then applications opened in them.
Here are the main highlights of this free and open source virtual desktop manager for Windows
- It replaces the original virtual desktop manager key shortcuts.
- You can move application windows from one virtual desktop to another via simple drag-drop.
- Not just application windows but you can also swap entire virtual desktop with some other as well.
- It adds a beautiful cube animation to switch between different virtual desktops that you have created so far.
- You can create new virtual desktops with this and even delete the existing ones if you want to.
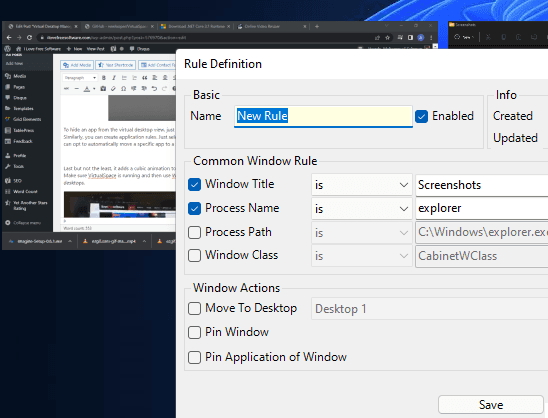
- It lets you apply some rules to the opened application windows as well. You can opt to automatically move a certain application to a specific virtual desktop based on text it contains in the title.
- With this, you can pin and hide apps and windows as well.
Using this Virtual Desktop Manager for Windows 11?
You can download VirtualSpace from here. After that, you can just run it administrator. Additionally, you need .Net runtime for desktop for it to run which you can download from here. After running it, you will see its icon on the system tray.
Now, you can start managing the virtual desktops. Press Win + Tab keyboard shortcut to see the virtual desktops and applications running inside them. You can see this in the screenshot below.

You can now simple move applications form one desktop to other. Just drag any application window from one virtual desktop to another. This is as simple as that. You can move app window from a virtual desktop in any direction.

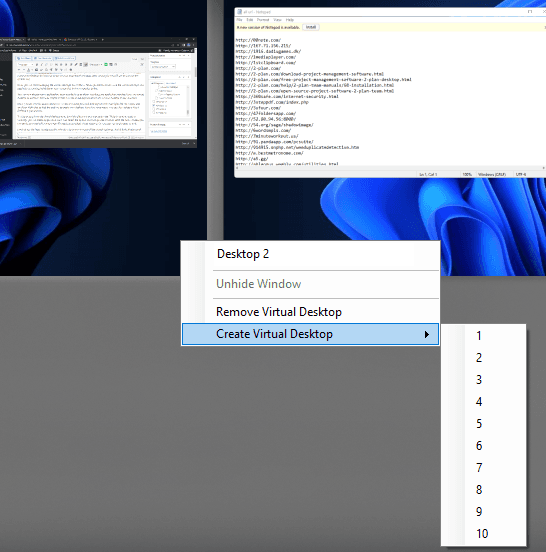
Next, you can use this same software to create and manage virtual desktops as well. Just right click on empty area and then right click to find the options to create new desktop. From the same menu, you can also delete a virtual desktop if you want to.

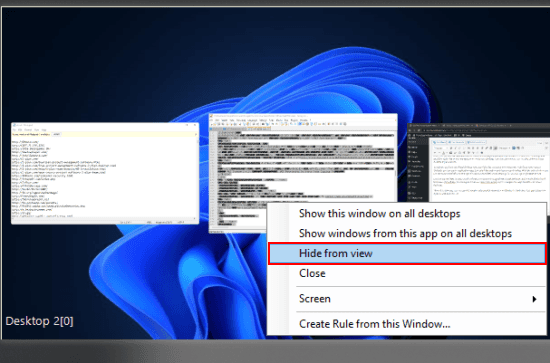
To hide an app from the virtual desktop view, just right click on it and then select the “Hide from view” option. Similarly, you can create application rules. Just select the option and then proceed further. With the help of rules, you can opt to automatically move a specific app to a specified virtual desktop. Or, you can opt to pin apps as well.


Last but not the least, it adds a cubic animation to iterate through all the virtual desktops. And it looks kind of cool. Make sure VirtualSpace is running and then use Win+Ctrl+Arrow keys to navigate through the different virtual desktops.
This is it. In this way, you can use this simple and powerful alternative to Window 11 Task view. Best part is that it is open source and you can use it on Windows 10 as well. If you often use virtual desktops a lot then you will like this. Just run it once and then access it using the native Windows VD keyboard shortcuts.
Final thoughts:
For enhancing the original virtual desktops of Windows, you can take help of VirtualSpaces software which is and awesome tools. I liked the way it works and set of tools and features it offers. So, give it a try and let me know what you think about it. Personally, I liked its ability to swap desktops and applications and of course the cubical desktop switching animation.