OpenELEC is a free Linux distro to turn PC into Media Center. Extremely lightweight and fast, OpenELEC (expanded as Open Embedded Linux Entertainment Center) is based on the JeOS (Just enough Operating System) concept. OpenELEC has been designed from the ground up to turn your PC into an XBMC based media center. It can be installed easily on a variety of hardware platforms (Intel, AMD based chipsets, Raspberry Pi, and even Apple TV), and is completely manageable by itself.
OpenELEC allows you to play and manage all your media (photos, music, videos, tv shows etc.) from a single unified interface, which is both functional and stunning looking. OpenELEC can either be installed as a standalone OS, or in a multi-boot configuration. It supports plug and play external drives (USB drives, Memory cards etc.), and can manage locally stored content as well. OpenELEC already comes pre-loaded with the necessary drivers to play most of the audio and video formats. It can even be updated automatically via Wi-Fi, and can be customized with a variety of skins and add-ons. In addition to that, it has tons of other features (automatic media metadata download, remote administration via SSH etc.). Sounds like something you could use to rejuvenate that old computer of yours? Keep reading to find out more.
OpenELEC: Installation And Main User Interface
Installing OpenELEC to your computer is not really that difficult, but it ain’t no cakewalk either. To install OpenELEC, you first need to copy it to a flash drive and make the flash drive bootable. Here’s a little step by step tutorial, explaining how to do it:
Step 1: Download the build of OpenELEC specific to your system under the Generic Builds section of OpenELEC website’s download section. Normally this would be a tarball archive (with a *.tar extension).
Step 2: Plug in a blank USB Flash Drive. Once it’s detected, extract the downloaded archive, and run the create_installstick executable in it. Within moments, this program would create a bootable USB that can be used to boot up your computer and install OpenELEC on it.
Step 3: Once you’ve restarted the computer and booted off the USB, choose the install option from the startup menu (Note: Although OpenELEC can be installed in a multi-boot configuration, its default behavior is to wipe the entire hard drive of the computer it’s installed on, because that’s how it has been designed to run. If you want to install OpenELEC in a multi-boot configuration alongside an existing OS, read more about it here). The entire installation takes about 5-10 minutes (yeah, you read that right!). Once the installation is done, simply eject the bootable USB drive and restart the computer.
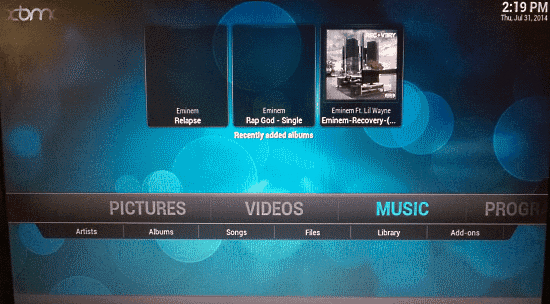
In no time, OpenELEC should boot up on your computer, in its full glory. Here’s how the primary user interface of OpenELEC looks like:
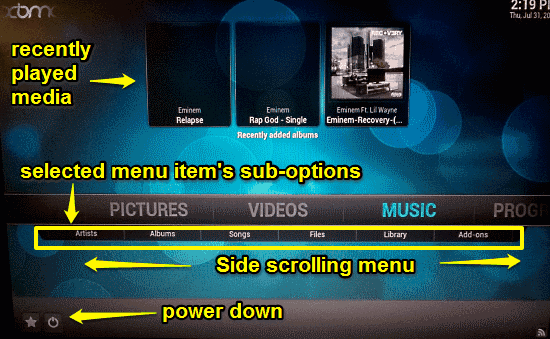
Looks pretty friggin’ awesome, don’t you think? As illustrated by the above screenshot, the user interface of OpenELEC is an absolute eye-candy, filled with glossy textured UI elements and smooth animated menu transitions. The entire navigation can be done via mouse (although the keyboard works just fine as well). The main primary navigation menu is laid out in the middle of the screen as a horizontal list which can slide to either side of the screen. Whenever you point your mouse pointer over a menu item to select it, another horizontal (but smaller) bar slides down, revealing additional sub-options relevant to the primary selected menu item. The main options (and their sub-options) are briefly mentioned below:
- Pictures: Lets you access all of your stored digital images and photos. Has an add-ons sub-menu item to add image plugins via the Internet.
- Videos: The hub for all your digital videos, as well as your movie collection. Has two sub-options: a Files (for accessing the videos), and add-ons (to download video playback plugins from the Internet).
- Music: The most extensive of all media hubs. It is the centralized location for all your digital music (in whatever format you may have it). Has a variety of sub-options: Artists/Albums/Songs (to view the songs via appropriate metadata filters, Files (to view the entire database), Library (to manage your music library), and add-ons (to download third party music playback and management plugins).
- Programs: Contains shortcuts to some general configuration folders.
- System: The master Control Panel for OpenELEC. An expansive section that lets you configure anything and everything from OpenELEC’s appearance (via skins downloadable from the Internet), and video/audio playback settings (codec selection, subtitle display, automatic plot/album-art fetching, library export/import, karaoke support and much more), to add-on downloads (audio, video, and even weather) and remote administration of the interface. If you’re a beginner, it’s advisable to not tinker with these settings.
How To Use This Free Linux Distro To Turn PC Into Media Center?
Although it’s true that OpenELEC is a pretty comprehensive software (After all, it’s a mini Operating System) and as such, is full of extensive features and options left and right, but using it is not really that hard. In fact, all you have to do is select the media content stored locally (or simply plug in a USB drive having the digital media), and start playing it via the appropriate playback sub-modules of OpenELEC. If you want better management of your digital media content, you can even use the built-in features to create libraries, playlists, collections etc. Here’s a little step by step tutorial, illustrating how to get started with OpenELEC
Note: The following steps illustrate the basic working of OpenELEC using some sample media files (songs, videos etc.) stored in an external USB drive. If you want to play locally stored media, you can easily use the relevant sub-module’s file manager link to manually browse to the media’s location on the hard drive and add it to the library (To know more regarding local media playback and management, refer to OpenELEC’s wiki page).
Step 1: Plug-in the USB flash drive (or any other external disk). Open ELEC will automatically detect and mount it.
Step 2: Using System > File manager, access the media stored on the flash drive. This will open up a mini file manager, which lists all of the media files stored in your external drive.
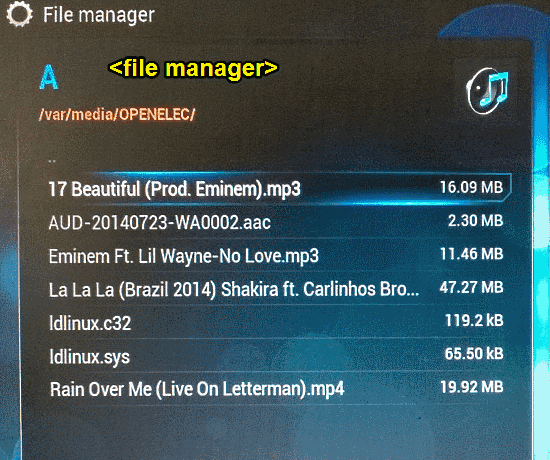
Step 3: After that, it’s just a matter of selecting the media file that you want to play. Simply select and click, and OpenELEC will automatically start playing it using the relevant sub-module. As simple as that!
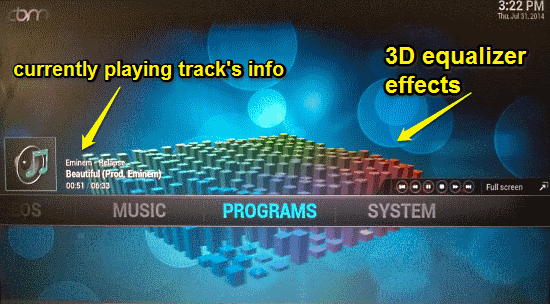
Here’s how a sample digital song looks when playing via OpenELEC. Notice the awesome 3D effects in the background. You can customize these from the settings easily. The menu bar can be also made to fade out from the view after some time.
Think that looked stunning? Oh you ain’t seen nothing yet. Check out the video playback in OpenELEC (Bet the user interface is reason enough to get this thing, it makes the entire media consumption experience so much more awesome).
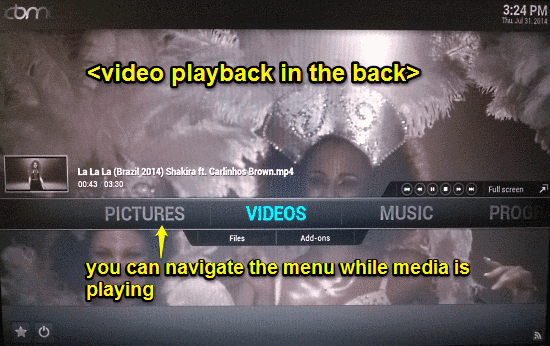
As illustrated by the above screenshot, you can navigate to the different menu sections even when the media is actively playing in the background. During video playback, the menu bar automatically fades out of the view after a while. Obviously, you can enable full screen media playback as well. Now that, is awesome!
OpenELEC: Primary Features Summarized
- Standalone and completely self-managed. Can be updated OTA via Wireless network.
- Automatic detection of connected audio/video input and output devices.
- Supports playback and management of almost all kinds of audio/video file formats (with more formats supported via additional plug-ins).
- Advanced media management and cataloging features, including automatic meta data fetching (movie plot summary, album art, star ratings etc.)
- Multi language subtitle support, built in RSS feeds, weather widgets etc.
- Completely customizable via a variety of skins and plug-ins.
- Remote administration via SSH.
- Power saving mode, master lock and password protection.
- Extremely lightweight, yet insanely powerful.
Also See: Free Fullscreen Media Center Like Video Player
Conclusion
OpenELEC is an incredible free Linux distro to turn PC into media center. At just about 200 MB in size installed, it’s almost ridiculous that this thing is filled with powerhouse features left and right. And if even that weren’t enough, its functionality can be further extended via a host of plugins available as over the air updates. If you have an old PC that you’ve long written off as unusable, try installing OpenELEC on it. You just might get surprised (really surprised).