This is a quick tutorial to explain how to permanently stop Google Chrome unloading inactive tabs. To do this, you just have to toggle one simple setting, which I will mention later in this post.
By default, Chrome now unloads the inactive tabs. This was intended to be a good feature to save RAM resources. But some websites do not play well with this feature. For example, WordPress. If you have some custom theme installed, then this memory saver feature of Chrome may cost you your work. The reason is that when Chrome unloads, a tab, it kind of disconnects the internet connection and your work might not get saved.
To fix the problems caused by Chrome’s behavior of unloading inactive tabs, you can simply turn this feature off. And it is very simple to do it. I don’t know if you can fix this organization wide using the Group Policy, but you can definitely fix this for individuals.
How to Permanently Stop Google Chrome Unloading Inactive Tabs?
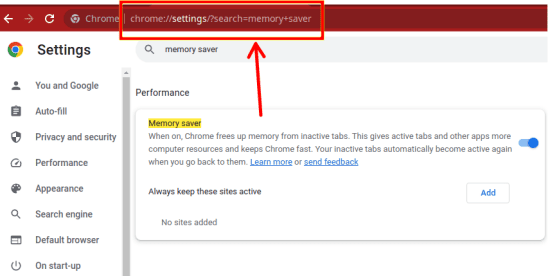
To disable Chrome’s behavior of unloading the tabs, you can simply. open it and then go to the Performance Settings.
Alternatively, you can also type the following Chrome URL in the address bar.
chrome://settings/?search=memory+saverThe Performance page of this setting looks like this.

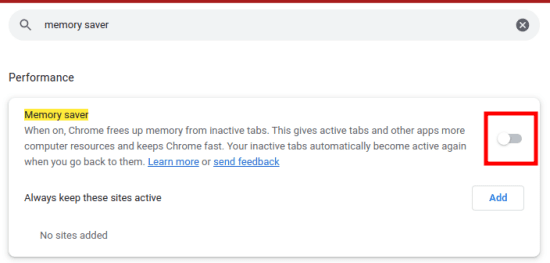
To turn off the Chrome’s behavior of unloading inactive tabs, you simply need to slide the switch to disable it. This is as simple as that.

After you do this setting, restart the Chrome browser and then you start doing your work as usual. You will notice that Chrome will not unload the inactive tabs. This is as simple as that. This method might not result in efficient use of the memory but rest assured, you will not lose your work ever again. But you can always turn it on in the same way later if you feel like that you need this feature.
Closing thoughts:
If you are a Chrome user and feeling that the Chrome’s memory saver is doing you no good, then this post is for you. You can now quickly disable this feature and prevent Chrome from unloading inactive tabs to save memory. I am sure that there are other ways maybe via extensions to do this but in my opinion, you don’t need that since you can do this using the built-in settings of the browser. And not just Chrome, but you can do this in other Chromium based browsers as well.