Here is a short tutorial that explains how to set up wireless hosted network in Windows 8. It will turn your Windows 8 PC into a wireless hotspot to share internet on wifi. This is perfect when you are using a dongle to connect to internet and want to share that internet connection with other devices.
Setting Wireless Hosted Network is nothing but creating ad-hoc wireless network using your current internet connection. As you know, ad-hoc wireless connection turns your Windows 8 PC into a virtual WiFi router so that other devices can connect and share the network.
Windows 7 lets you easily create ad-hoc network. Windows 8 has introduced ICS (Internet Connection Sharing), and hence has buried the ad-hoc feature somewhere in settings.
In this tutorial, I will explain how to create Wireless Hosted Network in Windows 8, so that you can make your Windows 8 PC a hotspot, that other devices can connect to to share internet.
Setting Ad-hoc Wireless Network In Windows 8:
To make Windows 8 PC a wifi hotspot, follow the steps below:
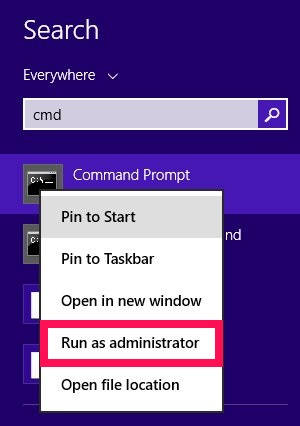
Step 1: Open Command Prompt by searching for it in search box. Right click on Command Prompt and click on “Run as administrator”.
The very first thing that you need to do is check whether your WiFi network supports Hosted Network or not. In the Command Prompt, type the below code to check that:
netsh wlan show drivers
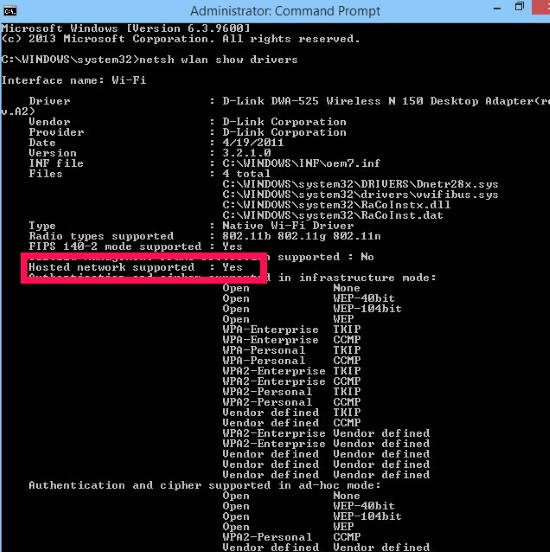
Navigate to the “Hosted network supported” and check if it is “Yes”. If it is Yes, then you can move ahead and set up the network easily.
Step 2: Now lets create wireless hosted network in your Windows 8 PC. To create, type the below mentioned code.
netsh wlan set hostednetwork mode=allow ssid="Network-Name" key="Password"
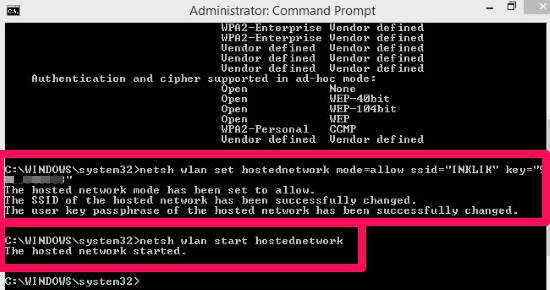
In place of “Network-Name”, type the name which you want to give to the Hosted Network. You can give the same name as your WiFi network name as well. And in place of “Password”, give the password that you want to assign to the network.
Step 3: Now your wireless network has been created, as you can see in your Command Prompt. But is has been created only; you need to Start it. To start, type the below mentioned code in the Command Prompt.
netsh.exe wlan start hostednetworkname
You will get a message in Command Prompt that says, “The hosted network started” (as shown in above screenshot).
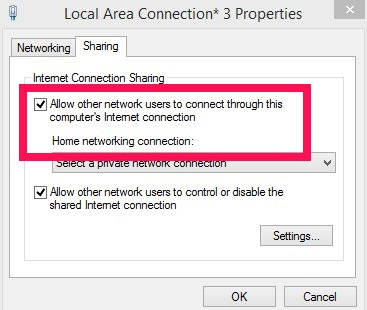
Step 4: Your hosted network has started now. However, by default ICS is not enabled in Windows 8. You need to enable it. To enable, go to the “Network and Sharing Center” and then to the properties of created network.
Or, open “Run”. Type ncpa.cpl in the run box. It will directly open the “Network Properties”, in new window. Check the first option that says, “Allow other network users to connect through this Computer’s internet connection”.
Step 6: Check the status of your wireless hosted network, by using the below mentioned code:
netsh wlan show hostednetworkname
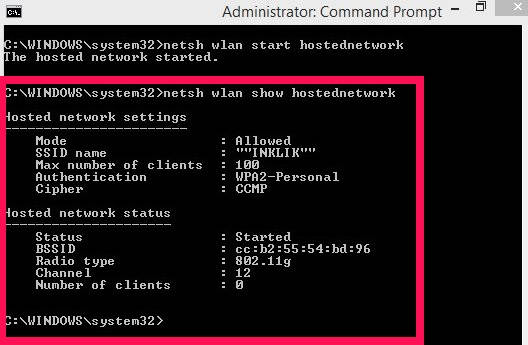
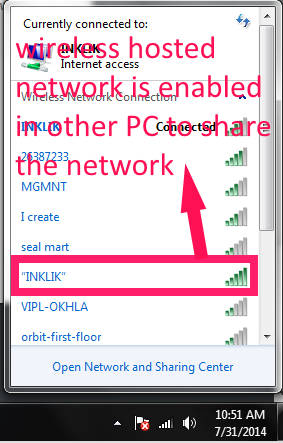
Step 5: Now you have successfully set permission to allow other users to connect to the wifi hostpot created on your Windows 8 PC. You can check your active network in “Network and Sharing Center” option.
Try to connect your WiFi enabled phone or other PC with the created Network. The hosted network is available for all other devices (which supports WiFi)
To stop this hosted network, use the below mentioned code in the Command Prompt:
netsh.exe wlan stop hostednetworkname
If you don’t like working with CMD, then you can even use freeware to create ad-hoc network.
Via Microsoft Community.
