Here is a small tutorial that explain how to create recovery drive in windows 8.
A Recovery Drive is a storage media that can be used to recover your system to the factory installation state. If your Windows 8 installation is giving you problems, like if it is suffering from viruses, crashing time and again, then your best bet to restore your system to a previous state while keeping all your data is using a Recovery Drive. But before you use a Recovery Drive, you must first know how to create it, because a Recovery Drive differs for every system, and it is not necessary that a Recovery Drive that worked on a different system would work on your system as well. In today’s dojo, sensei Pranjal will teach you how to create a Recovery Drive for your Windows 8 device.
Do remember that Recovery Drives can be created on USB sticks, CD/DVD or on an internal HDD of your system as well.
Alright mate, let’s get started!
As complex as it may sound, creating a Recovery Drive is pretty easy. Follow each of the below steps carefully, and you should have no problems whatsoever setting one up for your Windows 8 machine!
Step 1: Go to you Start Screen. In the Start Screen, type the word “recovery” (without quotes). You will now be presented with a window that should look like the below screenshot.
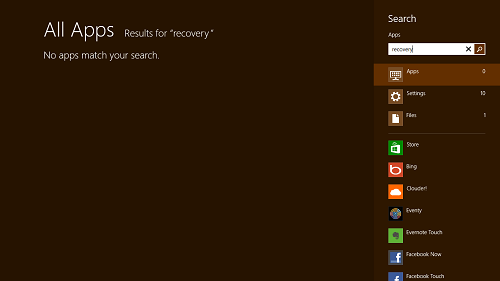 As Windows 8 searches all apps matching the search criteria by default, therefore you will see “No apps match your search.” displayed on your screen. To display the results, select Settings from the pane at the right.
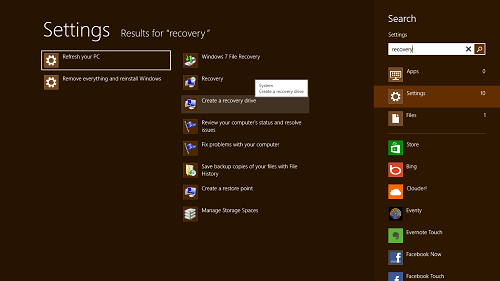
Step 2: Once you select Settings option from the right-side pane, you will be shown a window with the results which would look like the following screenshot. In this window, head over to the third result from the top, i.e., Create a recovery drive.
Step 3: Once you click on the Create a recovery drive option, you will be presented with a popup asking you to grant the permissions. Here, click the Yes button.
Step 4: Now, a software box that allows the creation of recovery drive should pop up on your screen. This window/box looks like the screenshot below.
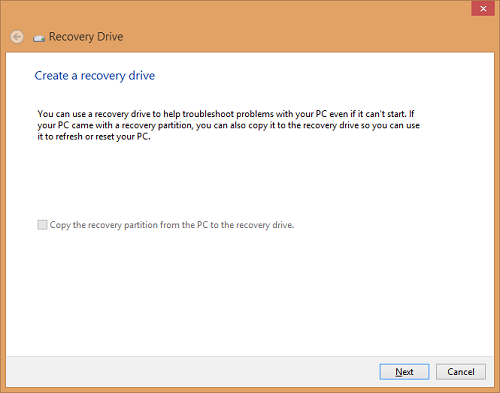 In the above box, make sure that the Copy the recovery partition from the PC to the recovery drive is UNCHECKED. Although this option is grayed out on most machines, if this option is available, you should make sure to uncheck this option. Once this requirement is met, click the Next button at the bottom-right side of the screen.
Step 5: Once you click on the next button, you will be presented with a screen that allows you to see various Recovery Drive creation options. This window should look like the following screenshot.
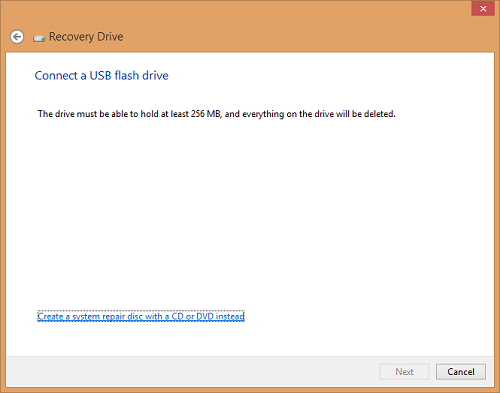 Once you are displayed the above box, you are ready to get started with the Recovery Drive creation process. If you wish to create your Recovery Drive on a USB drive, insert it and once it is recognised by the system, click on the Next button. Now, the process of Recovery Drive creation will start, and your Recovery Drive will be created within a few minutes.
Note: All user data on the USB drive will be formatted once you create a recovery drive on that USB drive, so it is advisable to take a backup of your USB drive before you proceed.
If you don’t want to create a Recovery Drive on a USB stick, and wish to use a CD/DVD instead, make sure that the disk is empty, and insert it into the Disk tray. Now, select the link Create a system repair disc with a CD or DVD instead at the bottom of the screen, and click the Next button.
That’s it. Your Recovery Drive should now be available to you within a few minutes.
Wasn’t that simple? Let me know in the comments section below!
