Webinaria is a open source screencasting software that allows you to create your own AVI or flash videos of your PC activities. Indeed this free screencasting software, lets you create your own instructional videos. It is a handy tool to have for educational purposes.
Unlike other screencasting applications, Webinaria is not only free, but also open source. As mentioned, this screen recording freeware, is able to record videos of your computer screen. You have the option to either capture a full screen or a single window. You also able to record audio to the video as well as include webcam images and text. Webinaria is also the ideal tool to have for creating your own screen-casts.
Also, this is one of the few screen recording software that comes with a built-in video editor to edit screen recordings.
Webinaria also has free hosting together with video sharing, allowing you to sharing your educational, and other screen videos with others across the Net. If you wish to save a video file to your hard disk or perhaps place it in a flash drive, you’re going to have to install the installation file from the Webinaria website. Once this file is on you hard disk, simply double clicking on the video file and you are able to save it to the drive or program of your choice.
Some other free screen recording software we reviewed earlier include: uTipu, Camstudio, and Jing.
How to use Webinaria:
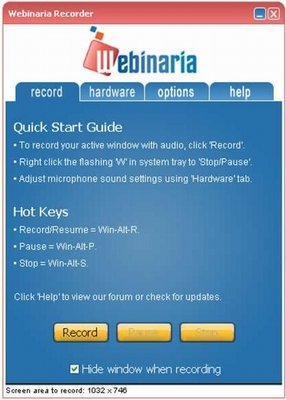
Using this screen capturing video software is simple as the software’s interface is self-explanatory and easily navigated. You will find the menu entry displayed in Windows Start menu under the Webinaria sub menu. simply click on the “make a Recording” button and the main interface window ill open with simple instructions. Prior to recording you should configure a few options.
- Check that the audio narration option is on or off, depending on your requirements.
- Check that your recording webcam is on or off.
- Capture the screen you wish to video – entire screen or sections.
- Set the frame rate – 5, 10, 15, frames per minute.
It is also important to configure webcam and sound-recording devices prior to starting this free screen recording software. These devices are able to be configured in the hardware options section within the program.
Before you start recording, make sure the “Hide Window when recording” box is checked. This will cause the Webinaria window to ‘hide’ the moment you press ‘record.’ Once you have set up this easy-to-use application, you may click on the record button and start making your own screen-cast.
When recording starts, Webinaria sits in the system tray and will not inhibit the recording. Using the right-click of the mouse, you are able to stop, pause, record and so forth.
There are also other options accessed by right clicking. The following hotkeys may also be used instead of the mouse.
- Alt+R – Record or resume.
- Alt+P – Pause
- ALT+5 – Stop recording.
Once you have completed recording, the application will ask if you wish to save the recording. You have the option of saving it as an AVI file (recommended) or some other video file.
Webinaria’s built-in video editor will open automatically the moment recording stops. You can then ‘streamline’ the recording to your requirements by performing the following; add text, add intervals, view the video frame-by-frame, adjust audio, preview the video, save to flash memory and publish. If you wish to upload the video to Webinaria’s website, you will need to open a free Webinaria account.
Webinaria is one of the easiest to use screen-casting video capturing applications available. It is the perfect video educational tool for academics and runs smoothly on any Windows computer from Windows 98 SE through to the latest Windows 7. It is not advisable to run this free AVI/flash video creator within a virtual environment, Webinaria works much better as a stand-alone application.
Download Webinaria Free.
