WinRoboCopy is the front end GUI of Robocopy which is a file replication tool for windows using command line. It is used to copy multiple files, entire directories or even complete directory trees from one directory to another. It can also be used to copy files across a network!
RoboCopy stands for Robust File Copy and it is an advanced version of Xcopy (Extended Copy).
There are several other GUI versions of RoboCopy which have been released by Non-Microsoft developers, WinRoboCopy is one of them.
Interface and functionality of WinRoboCopy
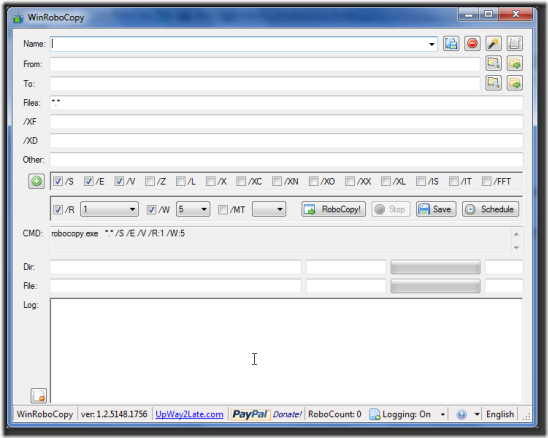
After downloading WinRoboCopy from the website and installing it, the first window pop-up looks like the below screenshot:
Let’s go through each field and it’s functionality in order.
Name
A drop down menu. You can choose an appropriate name for the current RoboCopy settings to be used later. It’s an optional field. 4 icons at the right are:
Save this job, Delete this job, Clear the current job, Open Script Editor Window.
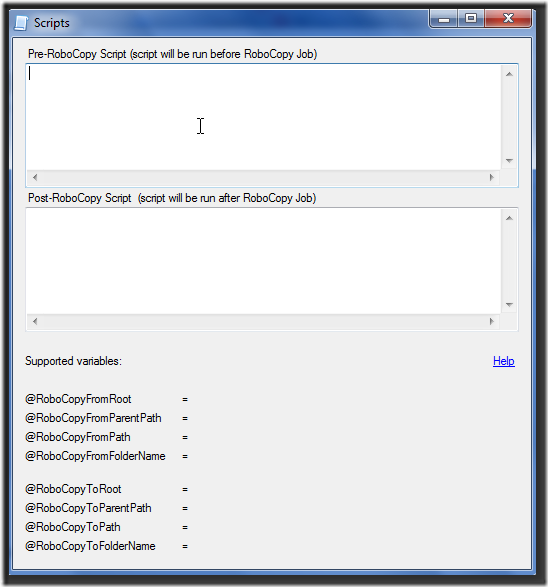
Script Editor Window looks like the screenshot below:
Each saved job can have a Pre-RoboCopy or Post-Robocopy script (this is optional). These scripts would run if applicable to the current RoboCopy job.
All the log is displayed in the Log Menu in the main window.
From & To
From and To are just plain fields indicating files to be copied from and to folder. You can Browse and Open Folders through the icons on right side.
+ Button
Clicking on the + Button (green shade) shows the complete functionality and meaning of the commands.
A snapshot of expanded + Button (which is a “– Button” below):
- Robocopy Button: Executes the RoboCopy command immediately
- Stop Button: Stops the running command
- Save Button: Current Robocopy job is saved which can be executed later
- Schedule Button: Schedule a RoboCopy job to be run later in Windows Task Scheduler
Others:
- CMD: Displays the current RoboCopy command in action
- Dir: Current directory to which files are copied.
- File: Copying files. Progress is shown in % on right.
- Log: RoboCopy output is displayed here. Also Scripts Log is maintained here. Output is saved to the system.
How does it work?
If you want to work with multiple functions of WinRobocopy, you can follow these steps:
- Give a name to RoboCopy settings (although this is optional. If you want to use the same settings again, you can save it).
- If you want to run some pre or post job for RoboCopy, you may input the desired function using script editor.
- Select the “From” and “To” folders for copying files from and to desired location.
- Expand the + button and check the required functions out of all the available functions as seen in the photo above.
- Once you’re sure of the setting, you can just click “RoboCopy” to run it instantly.
- Alternately, you can save the setting by clicking “Save” button. Name of this setting will be the name used in Step 1 above.
- You might want to schedule the job for a later time or event. Clicking “Schedule” enables this option to use.
- Progress and Log can be seen below after pressing the “RoboCopy” button.
While RoboCopy is a command line tool used by tech savvy people, its front end GUIs like WinRoboCopy is an easy tool with multiple functionalities in a single window. You can also save your RoboCopy settings which can be executed later for different locations thus making file handling easy. The link to WinRoboCopy download page is here.


