@MAX SyncUp is a free backup software which can be used to synchronize, backup, and restore files and folders between two computers, with Google drive or Flash drive, automatically. The software is Free for personal non commercial users.
This software uses RSync like algorithm which updates only parts of the file which have been changed. This is useful if the file is very large. The sync can be timed so that you don’t have to do it manually every time. The software has a great wizard which guides you through backup, restore and synchronization.
The users should remember that to synchronize between two computers over the internet, both should have @MAX SyncUp installed in both the systems. One of them should be setup as server and network should support UPnP. The software offers separate multiple profiles for backup, restore, and synchronization. If the backup is on the same computer or external drive, then the process is very fast; if it is over the internet, then it depends on your internet speed. The synchronization, backup, and restore can be done over Local or LAN devices, SyncUp server, FTP server, WebDAV server, and Google Drive. The software also gives the option to backup files by adding them to an archive and saving them with a password.
Backup and Synchronization can be done from separate folders at the same time to separate locations. It also has a feature that using a single profile you may be having a backup or synchronization of more than 1 folder.
Also check out: 4 Free Software to Sync Files Between Windows and Linux Computers
How to use @MAX SyncUp to Backup, Restore or Synchronize:
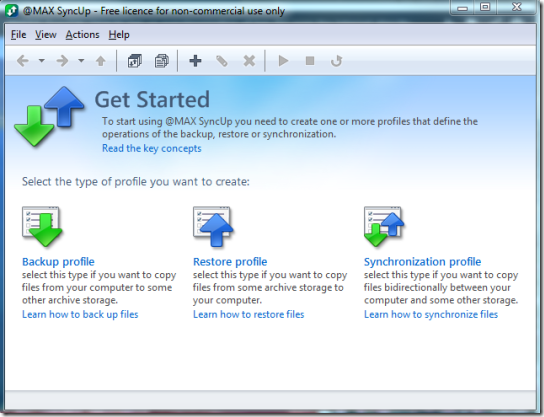
Once you complete the installation process, which is pretty quick, you will reach a home screen which looks like the one above. Here you have options to create separate profiles for the three major functions of this software: backup, restore, and synchronization. Lets talk about each of them one by one:
Backup
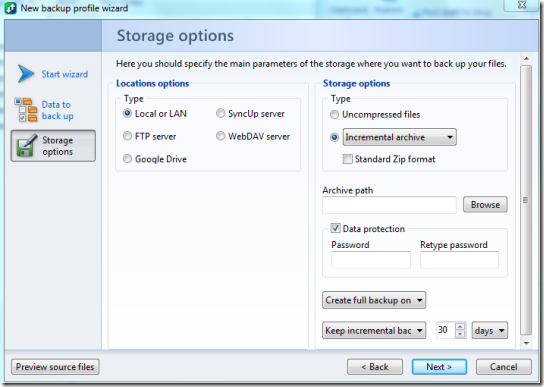
For Backup, click on the Backup Profile. This will start a wizard. The first thing the wizard asks you is the file or folder that you want to backup. Once you have selected the file(s) or the folder(s), you are forwarded to a screen like the one below. Here you can choose the location of the backup files or folders. Various options that it gives are: Local or LAN, FTP Server, SyncUp Server, WebDAV, and Google Drive. Except ‘Local or LAN’, for the others you have to enter the credentials, like username and password.
It gives you two options to store backups. You can either store as Uncompressed Files, or as Compressed archives. In case of compressed archives, you can choose to create Incremental archive, as well as specify password protection for archive.
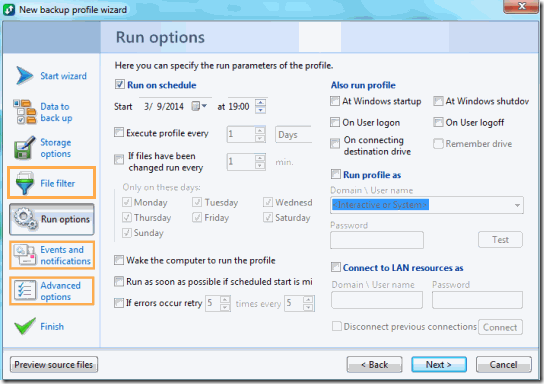
Once you select the storage options, you will be forwarded to a screen where you have to select the Run Options; meaning when you would want the software to automatically take the backup, how frequently you want to take the backup. It skips a step ‘File Filter’ which can be accessed from the left panel. The File Filter can be used if you want to select only specific file types to be backed up (for example, you might want only photos and documents to be backed up, but not music files). The Run Options screen looks like the one below:
After you select the Run Option, you will be directed to the Finish screen where you can give the name of the profile.
If you want to have certain notifications, like email notification on the completion of backup; or something to be executed before and after the backup has taken place, you can click the ‘Events and Notification’ on the left side. The ‘Advanced option’ below ‘Events and Notification’ gives Copy, Archive, and File Comparison option. Once completed, you can see a new profile in the home page, like the one below. Though it is scheduled for a particular time, you can run the backup anytime by clicking the ‘Run Now’ button.
Restore
Once you have created profile for either backup, restore, or synchronization, the home screen will change to list the different profiles you have made. Now to add a new profile for either of them, either click on the plus button ![]() placed below the menu bar or go to ‘New Profile’ under ‘File’ option. The New Profile Wizard will open up, where you can select from backup, restore, or synchronization. Let’s see how you can create a Restore profile.
placed below the menu bar or go to ‘New Profile’ under ‘File’ option. The New Profile Wizard will open up, where you can select from backup, restore, or synchronization. Let’s see how you can create a Restore profile.
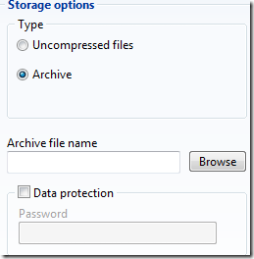
Select Restore and click on next. A storage option window will open up similar to the storage option that opens up when you are trying to create a Backup, where you will have to select the storage location. On the right you will see a window like the one given below, if you stored it as archive select archive and put in the password along with the archive location. If you are not restoring from an archive, then next window will be where you have to select folder location.
Once completed with this, you will be showed where the restoration would take place. You can select or unselect any file which you may or may not want to restore. After this, you are taken to the target path which lists the path where restoration will take place. Rest of the steps include Run Options, Events and Notifications, and Advanced Options which are similar to that when you are making a Backup. On the home screen go to the Restore profile you created and click ‘Run Now’ to start Restore.
If you are restoring from an archive, it will create the file and folder exactly in location from where you made its backup.
Synchronization
To Synchronize, select the synchronization profile from New Profile Wizard. You will be asked to select the folder or file which you want to synchronize. After the selection is over, you get a storage option similar to the storage option you get in other profiles. Select the one which you want. The type of synchronization file you want to create: uncompressed or archive. After this the steps are similar to that during backup or restore. If the files are to be synchronized to an archive, then the archive should pre-exist in the location where you are doing the synchronization.
Users should note that when they are synchronizing two folders, then deleting from one location will not delete the file from the other location. Later if you synchronize, all the files and folders will return to both the locations. When you wish to delete any file or folder then it should be deleted from both the locations simultaneously.
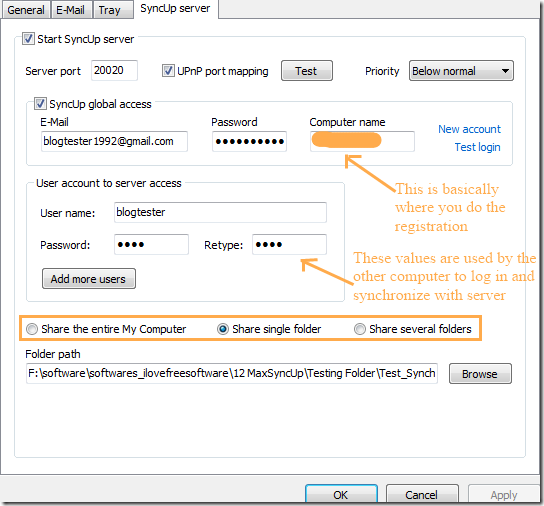
If you want synchronize between two computers, then one must be setup as the SyncUp Server, which can be done immediately after the software is installed or it can be done afterwards by clicking on Options under File menu and then selecting the SyncUp Server tab. Remember if you want to synchronize over the internet, then your network should support UpnP. The server setup looks like the one below:
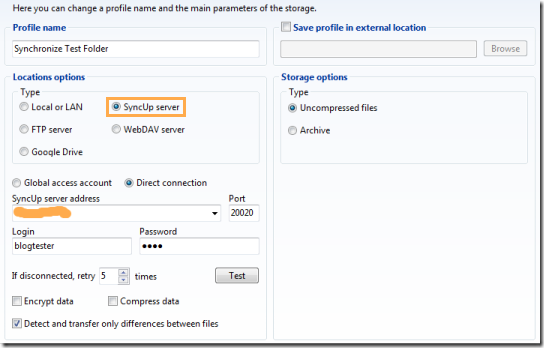
The computer which uses the above server’s space for synchronization should have the following details under Storage Option:
Keep Note that the ‘SyncUp server address’ should be same as the ‘Computer Name’ in the SyncUp Server setup.
A Quick Restore: This is possible if you have archived the folder to a location during backup. In order to restore, no need to run the software; just go to the location where the archive is stored and you can see two files with extensions .msav and .msai. Open either of them and you will be directed for a restore without having to create a profile for restore.
A Quick Compare and Sync: After installing the software when you go for the context menu of any folder you will notice a new option ‘Compare and Sync’. Clicking on it will open a wizard using which you can sync the folder over the network, internet, or even your external storage device.
Also check out: 5 Free Software To Create Backup On Another Computer.
Conclusion
@MAX SyncUp is a great software to backup, restore, and synchronize your files and folders. One of its cool features is you do not have a single defined folder which can or will be used for backup and synchronization. You can make more than one profile for each backup, restore and synchronization. Thus having multiple operations happening in the same time.
It is really a full featured software for backup and only other software which I think comes even close to it is CrashPlan. Though, I believe it is better than that too. The fact that it can back to FTP, WebDAV, and Google Drive push it to top of the list.
