This tutorial explains how to get username of your choice with Outlook.com.
You love Outlook.com, Microsoft’s re-incarnation of Hotmail, and you want to create an account for yourself. But there’s a small problem. The username of your choice has already been taken (Clearly, someone having the same name as you already beat you to it!). It might initially seem that the only choice you are left with is to either settle for a weird username (hotdude, linuxlovingnerd etc.), or drop the idea altogether. But hold on! There’s still a way for you to grab that username of your choice and use Microsoft’s Metro themed Emailing goodness. Excited already? Read on to find out more.
How is it possible for you to have an Outlook.com Email with your username even if it’s taken?
That’s what I am here to tell you. It’s essentially a trick, although be assured, you’re not doing anything wrong. See, unlike services like Gmail (where you can only have a generic @Gmail.com, unless you use Google Apps), Outlook.com offers you quite a number of choices, by allowing you to have an address with country specific domains. When Microsoft launched Outlook.com in late 2012, users’ response to the refreshed service was overwhelming. However, a lot of users expressed a desire to have Outlook email addresses with country specific domains to better reflect their place of origin. Listening to user feedback, Microsoft added 32 (that’s right, 32!) international domains in 2013.
And the best part is, you don’t have to be a resident of a particular country or have the IP of that country to have an account with a country specific domain. Now that’s awesome, isn’t it?
For a quick reference, Here’s a list of all 32 international domains supported by Outlook.com
- Argentina – outlook.com.ar (MSN Argentina)
- Australia – outlook.com.au (MSN Australia)
- Austria – outlook.at (MSN Austria)
- Belgium – outlook.be (MSN Belgium)
- Brazil – outlook.com.br (MSN Brazil)
- Chile – outlook.cl (MSN Chile)
- Czech Republic – outlook.cz
- Denmark – outlook.dk (MSN Denmark)
- France – outlook.fr (MSN France)
- Germany – outlook.de (MSN Germany)
- Greece – outlook.com.gr (MSN Greece)
- Israel – outlook.co.il (MSN Israel)
- India – outlook.in (MSN India)
- Indonesia – outlook.co.id (MSN Indonesia)
- Ireland – outlook.ie (MSN Ireland)
- Italy – outlook.it (MSN Italy)
- Hungary – outlook.hu (MSN Hungary)
- Japan – outlook.jp (MSN Japan)
- Korea – outlook.kr (MSN Korea)
- Latvia – outlook.lv
- Malaysia – outlook.my (MSN Malaysia)
- New Zealand – outlook.co.nz (MSN New Zealand)
- Peru – outlook.com.pe (MSN Peru)
- Philippines – outlook.ph (MSN Philippines)
- Portugal – outlook.pt (MSN Portugal)
- Saudi Arabia – outlook.sa (MSN Saudi Arabia)
- Singapore – outlook.sg (MSN Singapore)
- Slovakia – outlook.sk
- Spain – outlook.es (MSN Spain)
- Thailand – outlook.co.th (MSN Thailand)
- Turkey – outlook.com.tr (MSN Turkey)
- Vietnam – outlook.com.vn
What’s the catch?
Actually, there is none. You can create an account with a specific International domain, and keep it with you forever. The only difference is that you’ll be getting an Email address @outlook.xx or @outlook.xxx.xx instead of the generic outlook.com. Other than that, it’s just the regular Microsoft powered Email with all its goodies.
How to Get Country Specific Email Address with Outlook.com
It’s not really that complicated, but you’ll have to follow a couple of extra steps. Just follow the detailed steps, complete with screenshots and you’ll be rocking a new account in no time.
NOTE 1: Although you can create an account using any web browser, but I suggest using Google Chrome. The reason is, you’ll have to visit a few webpages that might not be in English (or your native language), and Google Chrome’s auto translate capability will really come in handy for the same.
NOTE 2: For the first step of the method described below, you can reference the direct links to the localized versions of MSN homepages that I’ve posted along with the country list earlier in the article. However, I wasn’t able to find the localized MSN pages for some of the countries (Czech Republic, Latvia, Slovakia, Vietnam). For those countries, you will need to try yourself.
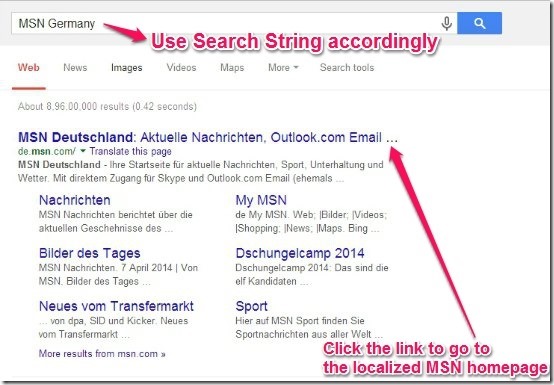
Step 1: First off, you need to search for the localized version of MSN homepage using the keywords MSN <Any country whose International domain you want to use for your account>. For example, if I want an Outlook.com with German ccTLD (@outlook.de), I’ll have to search MSN Germany. You can skip this step if you know the direct URL to the localized MSN homepage. When found, navigate to it
Step 2: When you access the webpage, Chrome will ask you to translate its contents from German to English. Once it’s done, you need to carefully look on the top right and find the words “Welcome to MSN”. Just below those words, you’ll see two links, “Options” and “Register”. Click on the latter. Check the screenshot below
Step 3: Clicking the link takes you to a familiar looking webpage. The webpage allows you to either Login or Register for MSN (which as you know, is basically the same thing as a Microsoft account, or an Outlook account). Note that some of the text would be still in the original language of the webpage (German). But we’re only concerned with Registration part. So just locate the words “Don’t have a Microsoft account?” and click the link “Register Now” beside it.
Step 4: Things start to look a little bit more familiar from here. You’ll see the account creation page, where you have to fill a whole array of details (Name, D.o.B, Username etc.). Now all you have to do is fill up the details and select a username of your choice. Note that the International domain has been defaulted from Outlook.com to Outlook.de (Pretty rad, don’t you think?). However, there are two things you should note here:
- Since you accessed the Account creation page via the German MSN page, the Country/Region is set to Germany by default. Change it to your Native country of origin (Although this can be changed later within the account settings).
- If you choose to enter your cellular number, you need to change the country there as well.
Step 5: Once you enter the details and click sign-up, you’ll be logged in (signifying successful account creation), and redirected to the German MSN homepage. All you have to do now is go to Outlook.com’s Homepage. That’s it. You’re logged into your brand new Outlook.de account in all its metro inspired glory.
You’re already halfway done. However, as illustrated by the above screenshot, the UI is in German by default, and has to be changed to English.
Changing Language of Outlook.com Interface
This is the part that’s a little tricky. Normally Google Chrome will automatically translate the Inbox view to English as well. But sometimes things go haywire. In case the translation is not automatic, follow the steps to get to the part where you can change the default Account language.
Option 1: Just click here to go to Language settings page. You need to be logged into Outlook.com first. Also, I am not sure if this works with all countries, so check if it works for you or not.
Option 2: In case the link above does not works, follow this long procedure:
Step 1: Click the gear icon on the top right and click then the third link from the bottom to access account options.
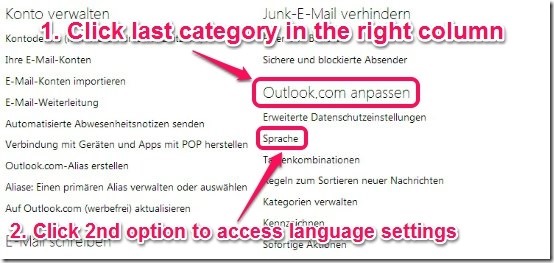
Step 2: Once in the account settings, you’ll that the settings are categorized under some Categories, spread over two columns. Here comes the important part. You have to navigate to the options in the right column, and click the second option in the last category. This will take you to the Language settings. Check the screenshot for reference.
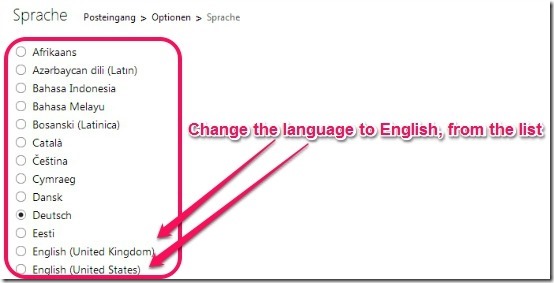
Step 3: Finally, find your desired language from the list (English in our case), and select it via the corresponding radio button. Scroll down and confirm.
Step 4: After this, go to bottom of the screen. You will see two button. The button in Blue is Save button. Click on that.
That’s all there’s to it, folks! Once the language has been changed, all you have to do is refresh your inbox, and you’ll see everything changed to English. Wasn’t that hard now, was it?
Some points to remember:
- The steps to search for the localized MSN Homepage and navigating to it remain the same, no matter which ccTLD you decide to use for your new Email address.
- Though very rarely, but it might happen that your username would be taken with a country specific domain as well. In that case, you just have to keep trying with different domains out of the above listed 32 until you find yourself in luck.
Conclusion
Microsoft’s Outlook.com is a great free Email service. It has received very positive response from the users. A lot of people signed up for the service as soon as it went live in 2012. And people are generally particular about the usernames they choose. This is true for all web services, and Email is no different. So if you’ve been holding off the urge to create a free Outlook.com account till now because of your desired username being taken already, this is your chance to make the jump. I suggest you give it a try, you’ll love Outlook.com.


