This tutorial demonstrates how to move and run existing Windows 10 apps from an external drive.
Sometimes due to low storage space on your PC, you might need to uninstall some of your favorite Windows 10 apps to free up space. But not anymore, as there is a way using which you can move all your existing Windows 10 apps to a USB flash drive or an external hard drive and then run them by connecting the drive to your PC.
In this tutorial, I will explain some simple steps to move and run Windows 10 apps (which you’ve already installed on your PC) from an external drive .

So, let us go through the steps.
How to Move and Run Existing Windows 10 Apps from External Drive
Step 1: At first, you need to ensure that you’ve connected the external drive to your PC in which you want to move the apps. In this tutorial, I will use a USB flash drive to explain the steps.
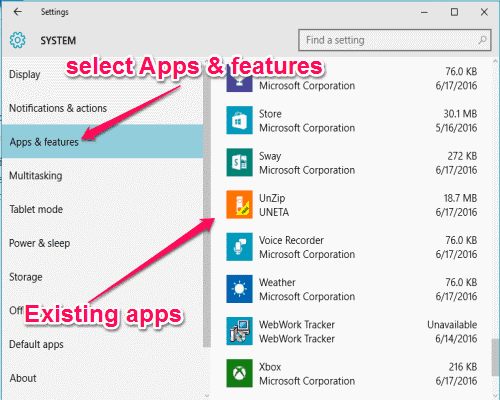
Step 2: To get started, open the Windows 10 settings by searching for “settings” in the Windows search bar or click the Start Menu to select Settings. After that, select the option “System” from the “Settings” window as shown below.

Step 3: As soon as you do that, you’ll see various options on the left navigation pane like Display, Notifications, Apps & features, Storage, etc. Click the “Apps & features” option to proceed and you’ll be able to see all your existing apps on the right.

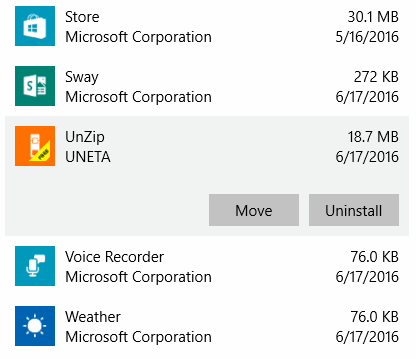
Step 4: Now, simply click on any app which you want to move to your external hard drive or USB flash drive. After that, two different buttons named, Move and Uninstall will appear below the app’s name.

Step 5: Click the “Move” button and a small dialog will appear where you can click the drop-down menu and choose the connected external drive. After selecting the drive to which you want to move the app, click the “Move” button in the dialog. That’s all, the app will be moved to the external drive in a minute or two depending on the size of the app. Remember, you can only move apps which you’ve installed manually and not the pre-installed ones.

Step 6: Let’s say, you want to check whether the apps are moved or not. To do this, eject the connected USB drive or external hard drive and then click the app to launch on your PC. If the app is moved to your external drive then the following error will popup when you try to open the app. Now, each time you want to use the moved apps, connect your external drive and select any app you want to run.

My Final Verdict:
This tutorial can come handy if you want to move all your existing Windows 10 apps to an external hard drive or USB drive. Doing so, you can clean your PC storage and access your apps directly from the external drive in which you’ve moved the apps.
I hope you find this tutorial helpful.