Kiwi Application Monitor is a free Windows application monitor to monitor Windows applications and get alerts and specify actions on them. The best part of this free Windows application monitoring software is that you can use it to monitor a particular Windows application and choose actions that will be performed automatically once a required condition or rule is met. Like you can monitor an application and apply a rule to automatically close it if the memory load exceeds a specific amount or start another application if the monitored application is closed or opened.
It also comes with other additional tools like Windows Services manager, Windows Process manager, etc.
So, keep reading to get to know how you can monitor an application using this freeware and apply custom rules for better Windows application management.

You can also use it to view complete system information, manage Windows services, process, and Windows startup programs.
It is quite a handy software that allows you to create an automated workflow, even though a simple one (in its free version) by applying some basic rules.
Note: In its free version, you can apply some basic set of rules. You can upgrade to its pro version to apply more advanced rules and custom automation scripts.
How to use this free Windows application monitor:
Kiwi Application Monitor is pretty easy to configure and you can easily add applications to monitor. The best part is that it can also alert you when an application starts or ends and even if an application exceeds a particular amount of memory or running time. For example, you can set an alert if an application is running for half an hour or so. You can also specify actions to close the monitored application if it exceeds a specific amount of RAM memory or running time.
Let’s see how to monitor Windows apps and apply actions and get alerts using this free Windows application monitor:
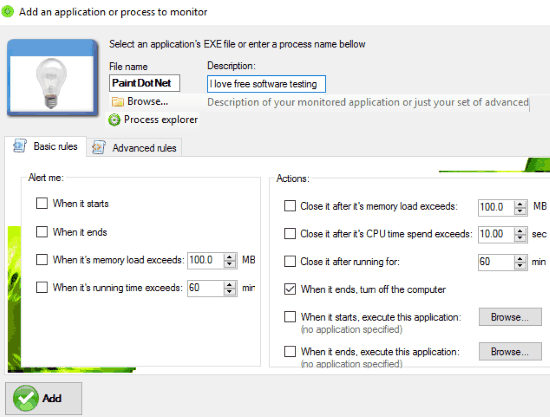
Step 1: To add an application to the monitor list, click on the Add button that appears on its main interface. It will then pop up a dialog box in which you have to specify the application executable path and the actions that you want to perform after a rule or condition is met.
Step 2: In this step, I will tell how you can apply rules and actions on an application to create a simple automated workflow. First select an application that you want to monitor by clicking on Browse button and select its executable file.
Now, you can set alerts and choose actions that will be performed automatically. You can set alerts when a particular application starts, ends, exceeds a specific amount of memory (RAM), and even if it exceeds a specific running time. For example, it can alert you if an application has started, occupied more than 100 MB (value can be changed) of RAM, or if an application is running for more than an hour, etc. The best part is that you can set multiple alerts for an application. To simply add an alert for the monitored application, select its corresponding checkbox, as you can see in the screenshot below.

After you have selected alerts, now specify actions for that applications. By using it, you can automatically close an application if it exceeds a particular amount of RAM, running time, or even turn off PC if it ends. To apply an action on the monitored app, select the checkbox corresponding to an action, as you can see in the screenshot included above.
You can even specify an application that will be automatically started if the monitored application is started or ended. To specify an application that will be started when the monitored application starts, specify the executable file of the application by clicking on the browse button and then tick the checkbox to apply the action.
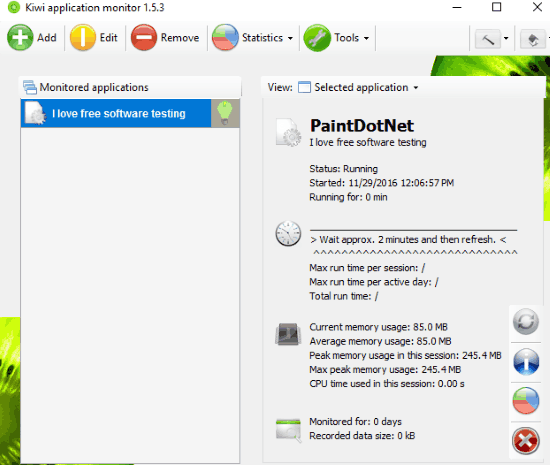
Once you have selected Alerts and Actions, click on Add button to add the selected application in Step 1 to the monitored list, as shown in the main screenshot. In the same manner, you can monitor as many applications you want. As you can see in the screenshot above, I monitored Paint.Net and specified an action to turn off my PC when it ended. After I stopped/ended Paint.net, after some time (10-15 seconds) this free Windows application monitor displayed an alert on my computer screen that your PC is going to turn off with the option to cancel the shutdown process.

How to manage system services using this free Windows application monitor:
As I mentioned earlier, you can also manage Windows services using it. By using its Services Explorer tool, you can start, stop, and pause system services. To manage system services, select Services Explorer from Tools menu. It will then open up its Services Manager tool from where you just have to select a particular service from the list and then press a button to start/stop/pause it.

In the same manner, you can manage processes using its Process explorer tool.
How to view complete system information on this free Windows application monitor:
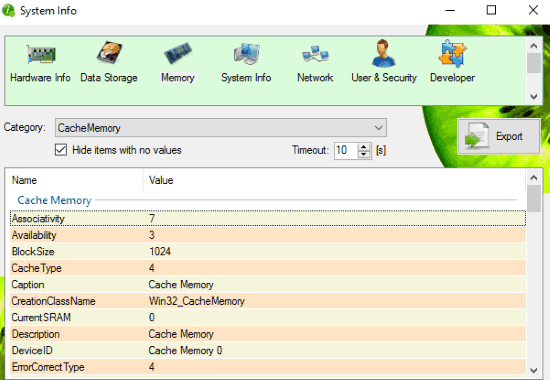
By using Kiwi Application Monitor, you can also view system information related to system hardware, storage, memory, network, user & security, and developer information. It also gives you the option to export system information in a category as a TXT file. To view system info in Kiwi Application Monitor, first open its System Info tool from Tools menu on the main interface. After that, select a category like Memory from the top of its main interface and then a sub-category from the drop-down list like CacheMemory. It will then display a complete info about your system’s cache memory like block size, cache type, etc.

The Verdict:
Kiwi Application Monitor is a free Windows application monitor that allows you to monitor multiple applications and apply custom rules to create an automated workflow. I will definitely recommend it as it is quite easy to use and comes with other handy tools as well. Check out its free version from the link given below.
Download Kiwi Application Monitor from here.