Here are 4 different ways to hide desktop icons in Windows 10. I have used desktop context menu of Windows 10, Registry Editor, Group Policy Editor window, and a free software to hide desktop icons in Windows 10. For each method, all the necessary steps are covered to help you hide desktop icons with ease.
All these methods work in a bit different way. For example, using the free software covered in this list, you can hide all desktop icons except the system icons (This PC, Recycle Bin, Network, etc.). And using Registry or Group Policy method, you can hide desktop icons as well desktop context menu.
You can also get back all desktop icons again. So everything will remain in control.
![]()
Method 1: Hide Desktop Icons In Windows 10 Using Desktop Context Menu
This is the easiest method to hide desktop icons in Windows 10. Only two clicks will help you hide all desktop icons. All you need to do is access desktop context menu of Windows 10. Right-click on Desktop → View → Show desktop icons. This option remains enable by default. Click on Show desktop icons option to disable it.
![]()
That’s it! Now all desktop icons are hidden. You can show all desktop icons again by enabling the same option.
Method 2: Hide Desktop Icons In Windows 10 Using Group Policy Editor Window
Group Policy Editor (or LGPO) method is also helpful to hide desktop icons. This is a bit powerful because after applying this method, it hides desktop icons as well as desktop context menu. You can also bring back desktop icons as well as context menu. So there is nothing to worry.
Step 1: Click on Search box and enter group policy or gpedit.msc. This will help you start Group Policy Editor window.
Step 2: In this window, you have to find Desktop folder. For this, double-click the User Configuration menu. It will expand options under that menu. Now double-click Administrative Templates folder. After that, you will see Desktop. Click on that folder.
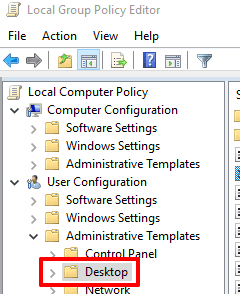
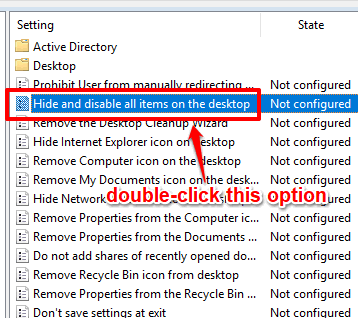
Step 3: You will see multiple options on the right side. You need to double-click on “Hide and disable all items on the desktop” option. It would be the second option.
Step 3: A big window will open related to this option. In that window, click “Enabled” option. After that, save this option using Apply and OK buttons.
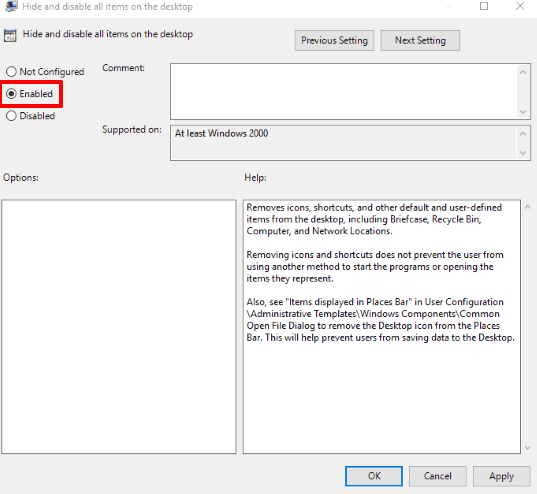
Now you will have to restart PC or File Explorer. This will apply the new changes and you will notice that desktop icons are not visible. You won’t be able to access desktop context menu also.
To show all desktop icons and desktop context menu again, you can use that big window and click “Not Configured” option. Save changes and restart PC or File Explorer to show all desktop icons again.
Method 3: Hide All Windows 10 Desktop Icons Using Registry Editor
This method works similar to method 2. That means this method also hides all desktop icons as well as right-click menu of desktop. And like method 2, you can show desktop icons as well as context menu again using this method.
Step 1: Start the Registry editor of Windows 10. You can do this using Run or Search box.
Step 2: In Registry window, find the Explorer key. You can access this location by using HKEY_CURRENT_USER, then exploring Software key, Microsoft key, Windows, then CurrentVersion key, Policies, and finally you can access Explorer key.

Step 3: Right-click on Explorer key, access New, and tap on DWORD (32-bit) Value option. This will create a new DWORD value. When the new value is generated, rename it as “NoDesktop“.
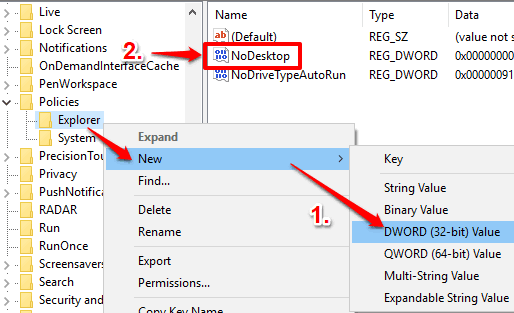
Step 4: Add ‘1‘ in NoDesktop DWORD’s value data. See the screenshot visible below.
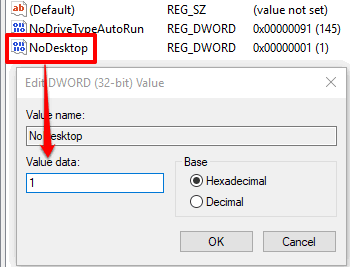
Now restart the PC or File Explorer.
You will see that desktop icons are hidden. Also, right-clicking on desktop will not show context menu.
To get back desktop icons and context menu, you can add “0” in value data of NoDesktop DWORD. After that, you can restart File Explorer or PC to show desktop icons as well as context menu.
Method 4: Hide Desktop Icons In Windows 10 Using a Free Software
If you prefer third-party products, then you should try some free software that can hide desktop icons for you. I have used one such software, named as “SHIcon“. This software can hide desktop icons in just two mouse clicks. The interesting part is that it hides all folders, shortcuts, etc., but doesn’t hide system icons (Recycle Bin, This PC, etc.) available on desktop. So if you are looking for software like this, then it is a definitely useful software for you.
Step 1: Use this link to grab the EXE of this software. Execute this software with admin rights and it will add “Hide icons.exe” file on desktop. Run that file as administrator and then it will hide all desktop icons except the system icons.
![]()
Step 2: To show all desktop icons again, you can execute SHIcon.exe file as administrator. This will remove Hide icons.exe file and bring all desktop icons.
You can read full review of this software here.
The Verdict:
Try any of these 4 ways to hide desktop icons in Windows 10 PC. I guess method 1 is the most suitable method in this list. I also prefer this method because we don’t have to follow a lot of steps, install software, or tweak system files.