This tutorial explains how to automatically clear browsing history on exit in Microsoft Edge. You can do this by accessing Edge browser itself and Windows 10 Group Policy Editor. When you have enabled this option, then browsing history, cookies, set aside tabs, download history, form data, passwords, and other items of Microsoft Edge browser are cleared automatically. You can also select if you want to delete only browsing history, download history, or all the items.
Clearing browsing data on exit in Microsoft Edge using these two methods is really simple. This tutorial makes it simpler for you as step by step process is covered for both methods.
Let’s start with first and easier method, which is Microsoft Edge browser settings.
Method 1: Automatically Clear Browsing History On Exit In Microsoft Edge Using Browser Settings?
In this method, you need to access the Settings of Edge browser and then select which browsing data you want to clear. Let’s see the steps:
Step 1: Use Start menu or click on Edge browser icon available on the Taskbar to open Microsoft Edge.
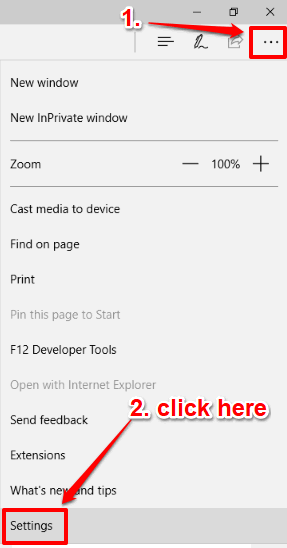
Step 2: Click on “Settings and more” icon (three horizontal dots) that is available on the top right corner of Microsoft Edge. You will see multiple options in a pop-up. Use that pop-up and click “Settings” option.
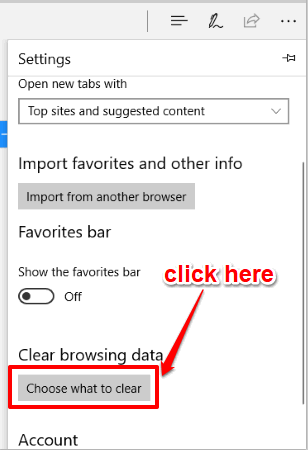
Step 3: Next you have to do is find Clear browsing data section. Under that section, you will see “Choose what to clear” button. Click that button.
 Step 4: Now you can select what type of browsing data you want to clear automatically. You can select download history, browsing history, cached data and files, tabs that you’ve set aside or recently closed, passwords, and form data. You can also expand more options and select media licenses, location permissions, Adobe Flash permissions, and other options. When you have done that, select “Always clear this when I close the browser” option.
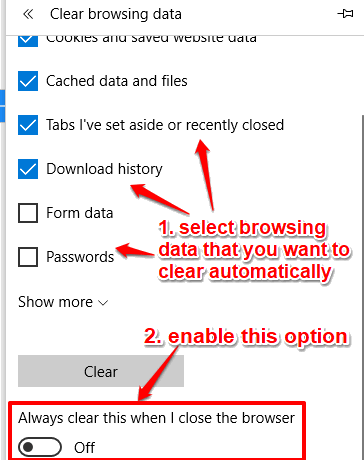
That’s it! Now you can use Microsoft Edge as usual. When you exit Edge browser, all the selected items are deleted automatically.
When you don’t want to clear browsing data automatically, you can uncheck the same option that is mentioned in above step.
Method 2: Automatically Clear Browsing Data Of Microsoft Edge On Exit Using Group Policy Editor?
Group Policy Editor method is more powerful than method 1. It is so because when this method is used, then the option to clear browsing data automatically remains turned on always. You can’t turn on/off that option using Settings of Microsoft Edge. The good thing is that you can use this method to get back to normal state and then option to automatically clear browsing data can be turned on and off anytime.
Group Policy is the built-in feature of Windows 10 Education, Pro, and Enterprise editions. Home edition user won’t find this feature. Still, there is a way to install Group Policy in Home edition. If you are running Home edition, you can install Group Policy and then use this method.
Step 1: Write gpedit.msc in Search box. This will help you start the Group Policy Editor.
Step 2: In Group Policy, access this path: User Configuration → then Administrative Templates folder → expand Windows Components folder → and click Microsoft Edge folder.
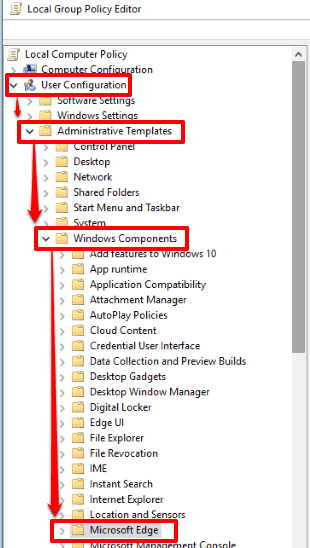
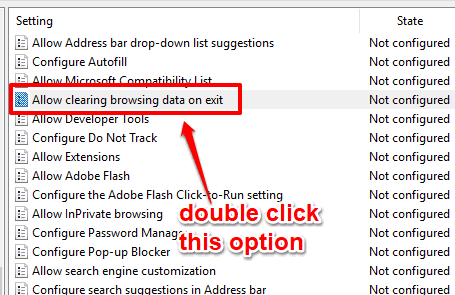
Step 3: A huge list of options will be in front of you. In that list, access “Allow clearing browsing data on exit” option and double-click on it.
Step 4: A separate window is opened. Here, you will see that Enabled, Disabled, and Not Configured options are present. To clear browsing data automatically for Microsoft Edge on exit, select Enabled, and apply this setting.
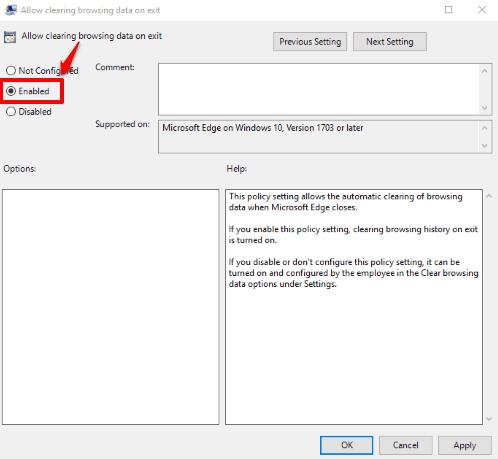
This is it! Now, whenever you exit Edge browser, all the download history, browsing history, and other selected data is cleared automatically.
To disable the feature to automatically clear browsing data of Microsoft Edge, you can select Disabled, and apply your new settings.
Don’t forget to check How to Disable Search Suggestions in Address Bar of Microsoft Edge and How To Block Extensions In Microsoft Edge Browser.
The Verdict:
Those who don’t want to keep the browsing data of previous sessions, clearing browsing data on exit in Microsoft Edge is a good feature. And for doing that, these 2 methods are handy. Here, method 1 is obviously easier than method 2. Still, you can have a look at both the methods and try them as per your needs.