This tutorial explains how to disable Snipping Tool in Windows 10. Disabling Snipping Tool feature is possible with two simple and native options of Windows 10. You can either use GPO (Local Group Policy editor) and/or Registry Editor for this. When Snipping Tool is disabled, you will see an error whenever you will try to launch it. You can enable it again whenever you want.
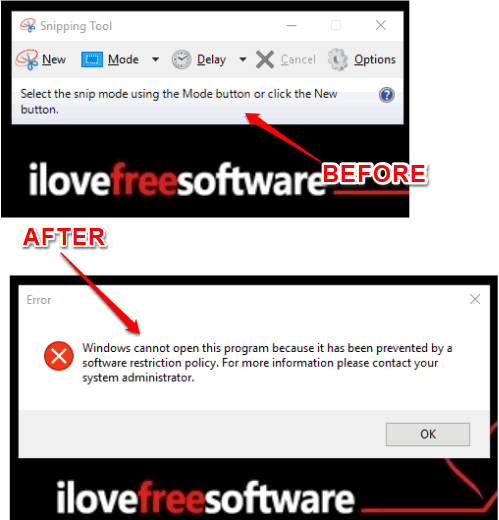
If you rarely or never use Snipping Tool in Windows 10, then disabling it might be a good option. The screenshot below shows before and after difference for Snipping Tool in Windows 10. When Snipping Tool is disabled, you will see an error like visible in above screenshot.
Let’s start with the easier method, which is Group Policy.
Method 1: How To Disable Snipping Tool Using Group Policy In Windows 10
Step 1: In this basic step, you need to start Local Group Policy. It can be done in multiple ways. The easier one is Search box. You can write gpedit.msc in the Search box and then use Enter key. This will help you open Local Group Policy.
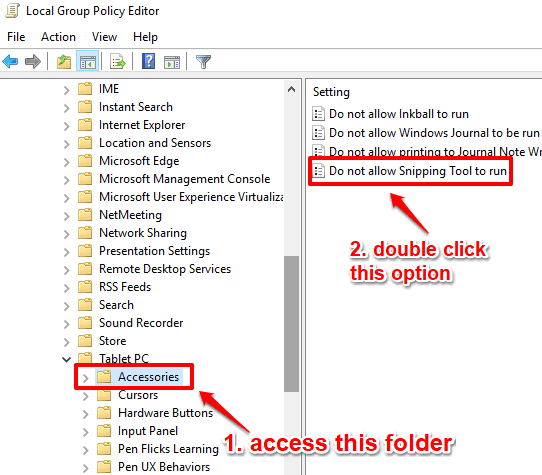
Step 2: Find Accessories folder in Local Group Policy. You can find it by following this path: User Configuration → Administrative Templates folder → then Windows Components folder → expand Table PC folder → and after that Accessories folder will visible. Select that folder and some options will visible at the right side. Among all those options, you have to double-tap on the “Do not allow Snipping Tool to run” option.
Step 3: Do not allow Snipping Tool to run window will open as a separate window. In that window, three options are available. These are: Enabled, Not Configured, and Disabled. Enabled option is used to disable Snipping Tool in Windows 10. So use that option and click on OK.
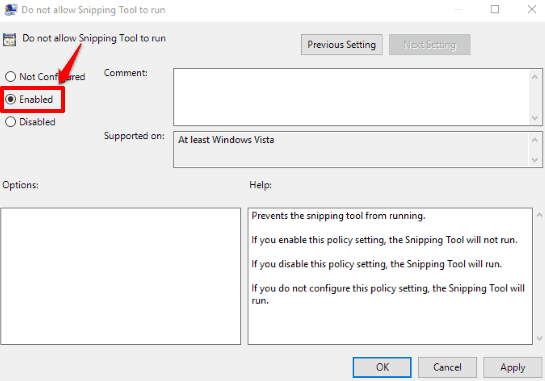
Whenever you want to access Snipping Tool in Windows 10, use Not Configured option or Disable option as mentioned above, and save settings.
Method 2: How To Disable Snipping Tool In Windows 10 Using Registry Editor
Step 1: This is a simple step. Start Registry Editor window. Use the Search feature of Windows 10, type regedit, and tap on “Enter” key. It will launch Registry Editor.
Step 2: Access “TabletPC” key. This key can be accessed easily by following this path: HKEY_LOCAL_MACHINE → SOFTWARE → Policies → Microsoft → TabletPC.
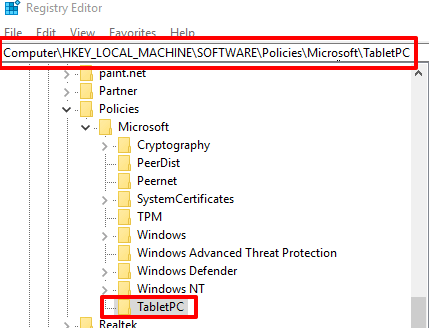
Step 3: Under this TabletPC key, you will see “DisableSnippingTool” Dword value on the right side. Its default value data is saved as ‘0’, which means Snipping Tool is enabled. To disable Snipping Tool, double-click that Dword, and put ‘1’ as Value data.
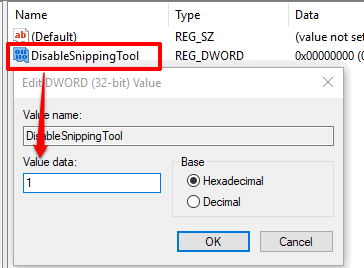
Save this change and Snipping Tool will be disabled in Windows 10.
To enable Snipping Tool again, simply add ‘0’ as Value data for DisableSnippingTool Dword and save it.
Here are some other interesting tutorials for you: How To Set Video As Desktop Wallpaper In Windows 10 and How To Disable Mobile Hotspot Feature In Windows 10.
The Verdict:
Snipping Tool is actually a very nice feature in Windows 10 using which you can capture and annotate screenshots. But if you use some other screenshot capture and annotator software, then Snipping Tool is probably not so useful for you. In that case, disabling Snipping Tool in Windows 10 would be a good option. These two simple methods are there to help you do this. I like method 1 over method 2.