This tutorial will show you how to move installed games to another drive. Moving games to other drives in a Windows PC can cause the files to corrupt or make them inaccessible for you. So, to move game folders, the only solution you have had is to uninstall it from the current directory and reinstall it on another drive. But today, I will show you 5 different methods using which you can now move installed games and without compromising any data or functionality. That means even after moving the game folders, you can still run the games from the new destination directory. Another use case of moving installed games to other drives is to free up storage space in the installation directory.
The methods include 4 free software and the command prompt of Windows PC. These software allow you to simply choose any game folder and then move it to a new directory or drive. They can do that by creating a symbolic link to the original game folder in the installation directory while moving all the files to the new destination directory. The command prompt also lets you do the same with ease.

Now, let’s get started with the methods.
FolderMove:
FolderMove is one of the best software to move installed games to another drive. You can use it to move any of the games you have installed in C drive to other drives without losing access to the original files or corrupting any data. Apart from games, you can also move other programs to any drive you want using this software.
How to Move Installed Games to Another Drive using FolderMove:
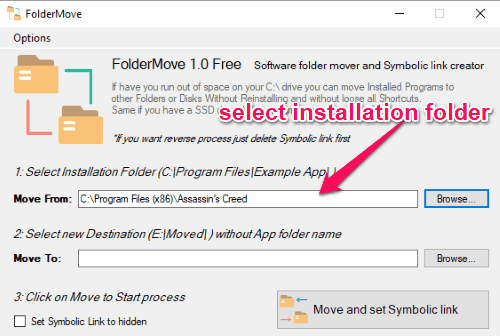
Step 1: To get started, simply install and open up “Folder Move” on your PC with admin rights. After that, you can see a 3-steps wizard for moving installed games to another drive. In the first step, you would need to select the installation folder of the game that you want to move. For that, you can simply click the “Browse” button and choose the folder.
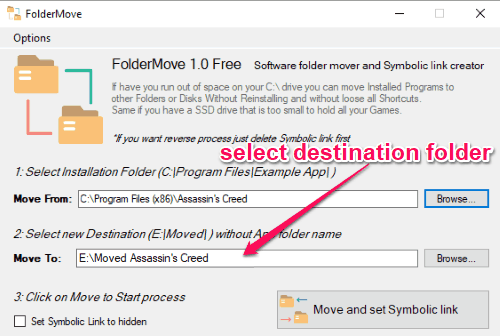
Step 2: After selecting the installation folder, you can proceed to the second step. In this step, you would need to select the destination folder to which you want to move the original game folder. You can either use an existing folder or create a new one.
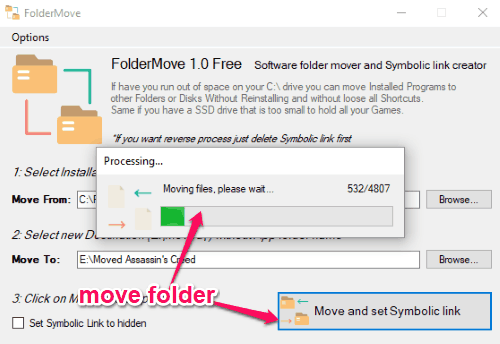
Step 3: After you’re done with selecting both the folders, you can go ahead and click on the “Move and set Symbolic link” button on the third step. As soon as you do that, it will start moving all the associated files from the installation folder to the destination folder. Once done, it will create a symbolic link to the installation folder in the installation directory. You can remove this link if you want to reverse the process and move back the game to the original installation directory.
Steam Mover:
Steam Mover is another free software that can help you easily move installed games to another folder without reinstalling. You can choose any game folder you want and then move it to any drive of your choice. This one also doesn’t corrupt the game data and you can play the game from the new destination folder as it uses the symbolic link created in the original installation folder.
How to Move Installed Games to Another Drive with Steam Mover:
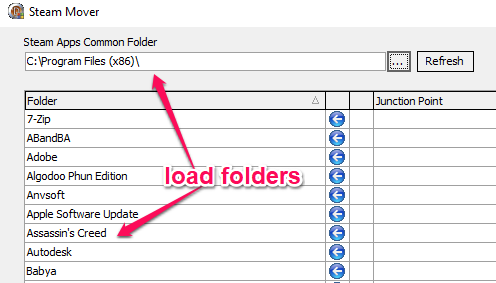
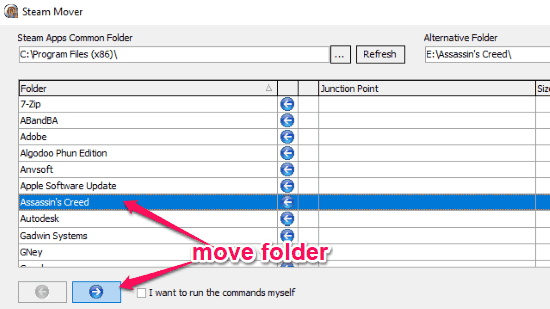
Step 1: After installing Steam Mover, simply open it and then you would need to select the game folder that you want to move. For that, click on the “Dotted’ icon associated with the “Steam Apps Common Folder” option. It would be great if you select the entire program folder such that you can choose which game folders you want to move from one window.
Step 2: After you do that, you can proceed and select the destination folder where you want to move the game folder. For that, click on the “Dotted” icon associated with the “Alternative Folder” option at the top. As soon as you do that, you can proceed to move the folder.

Step 3: To move the folder, simply select it from the list and then click on the “Right Arrow” icon at the bottom. When you do that, it will start moving the entire game folder from the installation directory to the destination folder. This way you can move all the installed games to another folder. If you want to move the folder back to the original directory, then all you gotta do is select it in the list and click on the “Left Arrow” icon at the bottom.
FreeMove:
FreeMove is one of the simplest software to move installed games to another drive without corrupting data or losing access to the original files. You can easily move any game folder from the original installation directory to any other directory you choose on another drive. Not just the games, you can also use it to move other installed programs.
How to Use FreeMove to Move Installed Games to Another Drive:
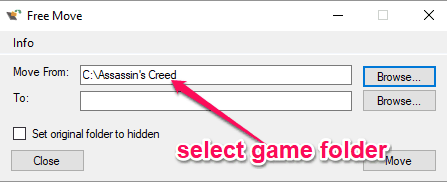
Step 1: To start, simply install and open this software on your PC. After you do that, the first thing you need to do is select the source game folder that you want to move. To do that, click on “Browse” button associated with the “Move From” field and select the folder.
Step 2: After you’re done with selecting the source folder, click on the “Browse” button associated with the “To” field. Then you can select the destination directory in other drives where you want to move the game folder.
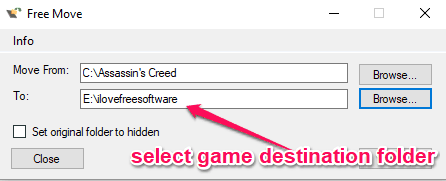
Step 3: As soon as you’re done with that, you can simply hit the “Move’ button visible at the bottom of the “FreeMove” interface. After that, it will start moving all the files from the original game folder to the newly selected destination. When the process is complete, you can see a symbolic link in the installation folder and can use the new folder to run the game. You can reverse the process by deleting the link and then moving back the folder to its original location.

SymMover:
SymMover is also a free software which you can use to move installed games to another drive without reinstalling. You can choose any game you want and then move it to other drives to free up space in the current installation directory. The data will not be corrupted or become inaccessible, as it will keep a symbolic link of the folder on the original directory. This can also help you move other programs to another drive. It is a pretty popular software and you can read more about it from here.
How to Use SymMover to Move Installed Games to Another Drive:
Step 1: First, you would need to download and install “SymMover” on your PC. Then simply open it and you can see two different sections on the main interface named, “Folders in Source” and “Folders in Destination”. Now, you would need to add the game installation folder, which you want to move, in the “Folders in Source” section. You can do that just by clicking on the “+” icon.
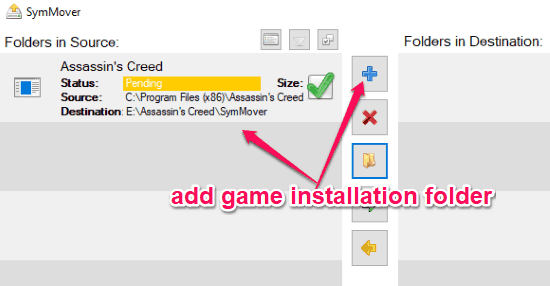
Step 2: After adding the game folder, you can choose the destination folder where you want to move the original folder. To do that, click on the “Folder” icon visible on the toolbar at the center. Then you can create a new folder or choose one of the existing ones.
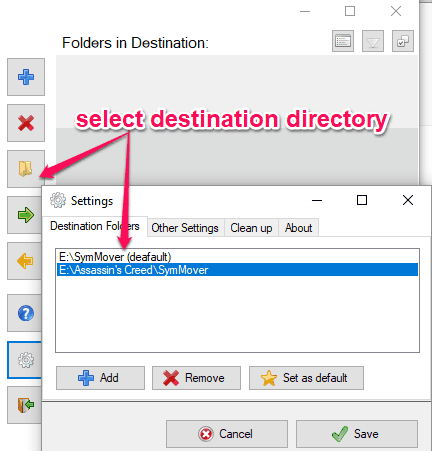
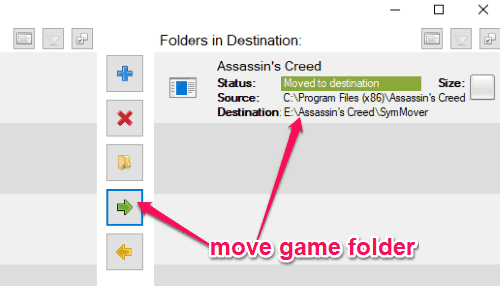
Step 3: When you’ve selected the destination folder, simply click on the “Green Arrow” icon to move the installation folder (along with its files) to the destination folder. Now, it will also create a symbolic link in the original installation directory, but keep all the game files in the new directory you have selected. Moving the folder back is pretty easy while using this software, as all you need to do is select the moved folder in the “Folders in Destination” section and click the “Yellow Arrow” icon.
Command Prompt:
The command prompt in Windows PC can also be used to move installed games to other drives without losing or corrupting data. That means after moving the games, you can play them directly from the new destination folder and without reinstalling them. There are some simple commands which you need to execute to do the same. Apart from games, you can also move other programs using the command prompt.
How to Use Command Prompt to Move Installed Games to Another Drive:
Step 1: To begin, the first thing you would need to do is create a copy of the main installation folder (in C drive) in any of the drives where you want to move the game folders. For example, if the main installation folder is “Program Files (x86)”, then you need to create a copy of that with any name you want. To do that, simply open the command prompt with admin rights and run the following command:
robocopy "C:\Program Files (x86)" [drive initial]: \[New Destination Folder Name]
As an example, you can see in the below screenshot that I have selected the “E” drive and the folder name as “Programs”.
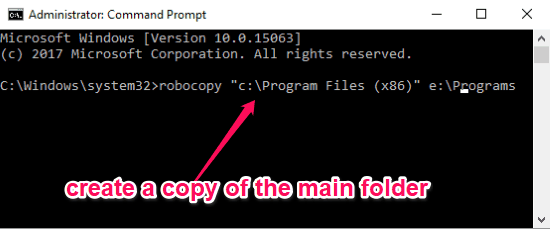
As soon as you do that, a new folder will be created on the selected drive with the name you have given. In case, the name is shown similar to the original folder, you can easily get rid of it and use the name you have given. To do that, you would actually need to remove the “desktop.ini” file associated with that folder.
Step 2: Once you’re all set with the main destination folder, you can go ahead and move any installed game folder from installation directory to the new directory you have created. To do that, you would need to run the following command:
robocopy "C:\Program Files (x86)\[original game folder name]" [new drive initial]:\[the new folder copy name]\[any existing or new folder name]/sec /move
As an example, you can see in the screenshot below, that I have used the game folder name as Assassin’s Creed, drive initial as E, the folder copy name as Programs, and the new destination folder name as New Assassin’s Creed.
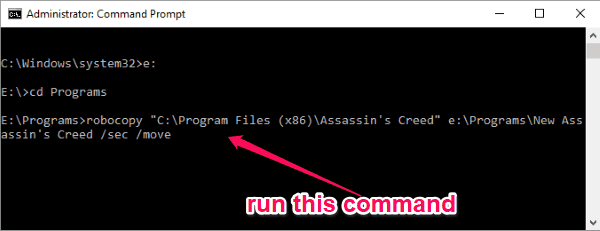
Step 3: As soon as you run the command, it will automatically start moving the folder and its content from the original installation folder to the new destination folder. You can now play the game from the new drive as it will not corrupt any data due to the symbolic link in your C drive.
Conclusion:
So, these are some of the best ways you can use to move installed games to another drive. These methods are super easy to perform and you can move your game folders in no time. So, if you want to save more storage space in your default installation drive, then start moving the large games, you have installed on your PC, to other drives which have plenty of space.
Try these methods and let me know if you were able to move your installed games.