Here, are steps to assign ringtone to different contacts on Android phone. We normally set ringtone on our Android phone from any mp3 song or from default ringtones which comes pre loaded on Android phone.
The ringtone which you select works as default ringtone for all contacts saved on your phone. Also, your Android plays same ringtone for those contacts too which are not saved in your phone’s contact list.
Setting different ringtone on different contacts is a perfect idea to know who is calling you without checking your Android phone’s caller Id. By listening to the ringtone only, you can decide that whether you want to answer that call or not. Below are the steps to assign different ringtones to different contacts on Android phone.
Steps To Assign Ringtone To Different Contacts On Android:
Step 1: Launch contact list on your Android phone.
Step 2: Scroll the contacts down or up to select a contact on which you want to set ringtone.
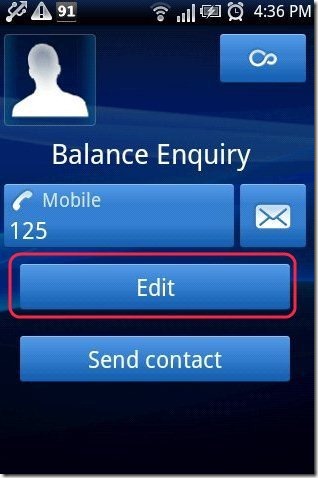
Step 3: Tap on the contact to open the options and other details of the contact.
Step 4: Tap on edit option to edit the contact details.
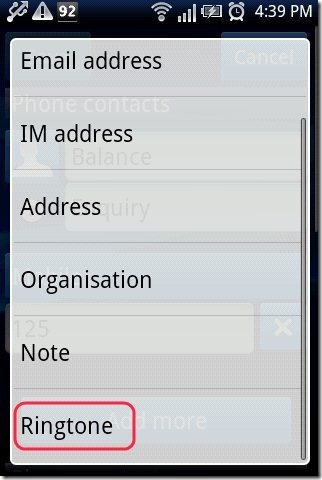
Step 5: You will find a “ringtone” option from the list of other options available. Tap on that “Ringtone” option from the list.
Step 6: Select the target app from which you want to select ringtone.
Step 7: Select the ringtone or mp3 file which you want to set as ringtone on that particular contact.
Step 9: Now whenever that person calls you, your phone will play the ringtone set for that particular contact.
Also, check out how to set mp3 as ringtone on Android reviewed by us.
Likewise, you can assign ringtones to any number of contacts on your Android phone. Each number in your contact book can be assigned a different ringtone. This is the easiest way to distinguish the people calling you without looking at your phone’s screen. You will immediately know from the ringtone if it is someone important who is calling or someone who’s call you can miss. Go ahead try it out.


