In this article, I’m covering a free email marketing tool by HubSpot that has a drag & drop style email template builder. This new email marketing tool is recently added to the HubSpot CRM. It lets you send 2000 emails per month in the free plan and provides limited post email analytics for lead generation and user engagement analysis.
This HubSpot Email Marketing tool makes the process of email marketing simple and quick. It has a drag & drop style template builder where you can select an email template and personalize it as per your needs. You can add new items to the email template and customize the design as per your liking. Furthermore, this tool supports dynamic email subject lines which you can personalize by user type and property. The free plan also includes email scheduling along with device and user-specific email preview.
After sending the emails, you can check the analytics for all your email campaigns and export the data to Excel or CSV for further analysis. Similarly, you can also export all the emails you have created with this tool. If you are moving from another email provides, this tool provides you a step-by-step guide to help you migrate to Hubspot.
Also read: ESP Finder: Find Email Marketing Platform Used to Send Any Marketing Email
Free Email Marketing Tool from HubSpot
To use this free HubSpot email marketing tool you have to create an account on HotSpot. You can also use your Google account for quick signup. After creating an account, log in to HotSpot. Then, head to the Marketing section and select the Email option to access the email marketing tool.
This email marketing section is where you can create and manage all your email campaigns. Once you created emails, you can access them here. You can sort the emails by Draft, Scheduled, Sent, Archived, and All Emails. Furthermore, you can create folders to manage different email campaigns separately. From here, you can also export a particular email(s) to Excel or CSV file. With all that out of the way, let’s see how to create a new email with drag and drop template editor.
Building an Email Template
When you create a new mail with the HotSpot email marketing tool, it gives you a list of templates. It covers email templates for various purposes such as promotion, newsletter, event invites, sale, birthday, etc. When you select a template, it opens in the editor where you can personalize it as per your needs. This editor has three sections; Edit, Settings, and Send or Schedule.

In the Edit section, you can personalize the template. This section has two tabs; one for Content and another for Design. From the Content tab, you can drag and drop new items to the template. Here you can add Image, Text, Button, Divider, Social Media Links, and Layouts to the template. After adding these items to the template, you can customize them with your data.
Apart from that, you’ll need to add your company address before you can send any emails. You can do that in the Edit section at the end of the template.
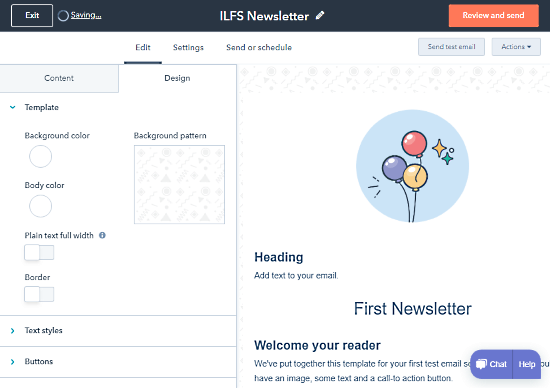
After finalizing the content of the email template, you can customize its design from the Design tab. Here, you can change the background and body color of the template, choose a background pattern, and add a border around the template. Furthermore, you can personalize the appearance of text, buttons, and dividers as well. With all these features, you can fully customize the content and design of the template for your email campaign.
Personalized Subject Line
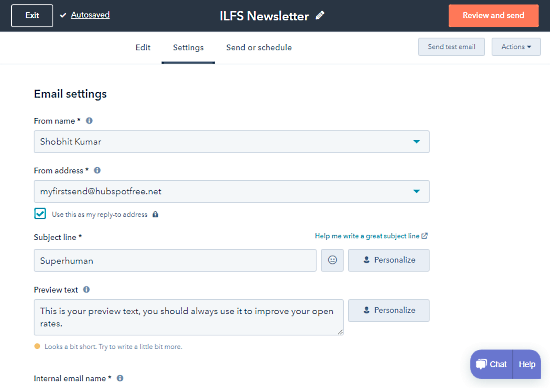
In the Settings section, you have to provide your information that will be shown in your email. Most of this information is automatically filled as per your HotSpot account. The only information you have to enter is the subject line for the email. Now, you can either use a static subject line with emojis or create a dynamic subject line by inserting a personalized token. To do that, simply enter a subject line and then click the “Personalize” button next to it. Then, select the user/company and property type to insert a personalized token to the subject line.
Send or Schedule
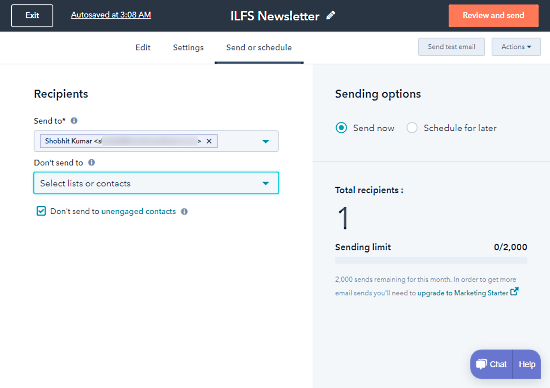
At this point, your email is ready, you can send it right away from this section. Here, you can enter the recipients or recipient groups and send the email instantly. And, if you want to schedule the email for a later time, you can do that too. Simply choose the “Schedule for later” option instead of “Send now” and enter the date and time. Then, click the Review and Schedule button from the top. This shows you a preview of the email and schedules it for the mentioned time.
Email Preview
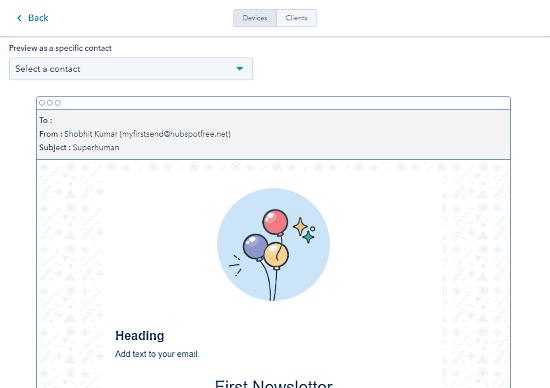
This tool shows you a preview when you schedule an email. You can also get this preview anytime by choosing the Preview option from Actions. This shows you a preview of the email for a desktop and mobile device side by side. You can preview the email as a specific contact to check the dynamic subject line. Apart from the device preview, this tool also has a client-based preview that shows the email preview based on the different email clients. But this feature is under the paid plan.
Email Analytics
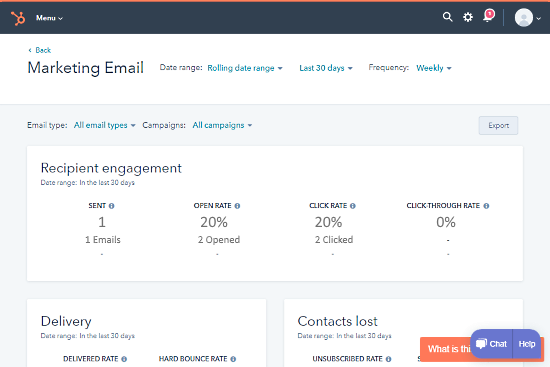
After sending the email(s), you can also check the email analytics to analyze your email campaign. The analytics section shows you the following information:
- Recipient Engagement – Send Emails, Open Rate, Click Rate, and Click-through Rate.
- Delivery – Email Delivery Rate and Hard Bounce Rate.
- Contacts Lost – Unsubscribed Rate and Spam Report Rate.
- Performance over time
- Engagement by device (opens and clicks)
- Top-performing emails
Try this free email marketing tool here.
Wrap Up
HubSpot Email Marketing Tool provides lots of advanced features which are usually not found in free plans. It has a drag & drop template editor with support for personalized subject line and email scheduling. And, the detailed email analytics adds a cherry on top with all the stats and reports which you can export to Excel or CSV. Give it a try yourself and let us know your thoughts in the comments.