Here, is a simple tutorial that will teach you how to change the host file in windows 8. Here we are going to change settings in the Host file of your new new Windows 8 PC. In windows 7 is was even simpler but in Windows 8, Microsoft has put a little restrictions. So this how to will be a little longer.
The restrictions have been put in to protect the user of Windows 8 from malware and malicious attacks. This protection is provided by the Windows Defender. You can disable Windows defender entirely, but that is not a good idea.
So here in this simple step-by-step tutorial that will teach you how to change the host file in windows 8 without any third-party software.
Steps to change the host file in windows 8:
- First we have to open up Windows Defender and stop Windows Defender from monitoring the host file; so that we can modify it according to our need and do whatever we want with the it.
- To open Windows Defender, just start typing “Windows Defender” on the Start screen. And select it as shown in the screen shot to open Windows Defender.

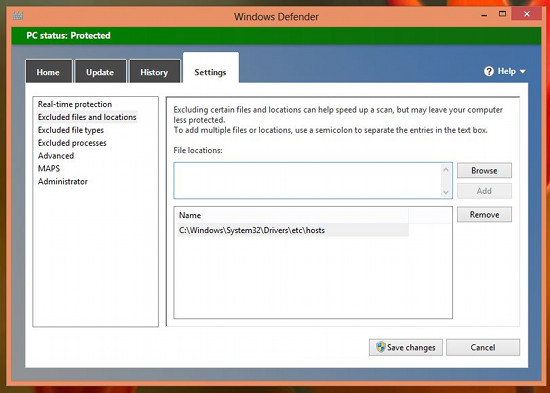
- Now the application will open up. Here firstly, switch to the Settings tab and then click on Exclude files and locations. After you have reached here, now just click on the Browse button and navigate to the ” C:\Windows\System32\Drivers\etc\hosts “, select the file named hosts and click on OK button. Now click on Add button. After you have completed all the steps stated above, your Windows Defender should look like same as shown in the screenshot below. Now just click on the Save changes button to save all these change.

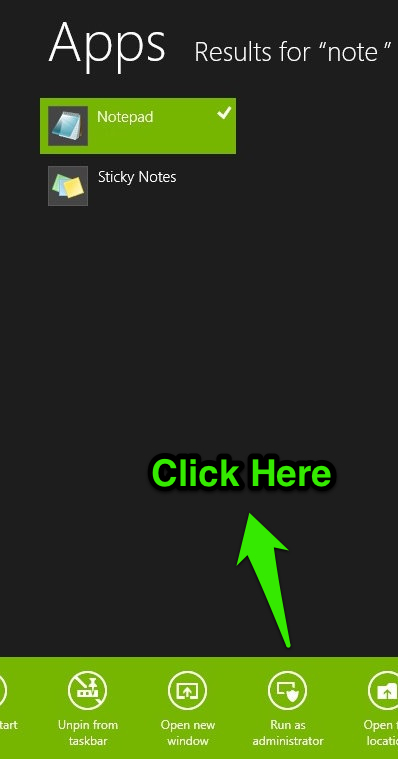
- Now launch Notepad in administrative mode. To do so, just start typing Notepad in the start menu and instead of a normal click just do a right-click over it. Now a menu will open up as shown below. To run the application as administrator just click on Run as administrator.

- In notepad click on the File > Open , navigate to “C:\Windows\System32\Drivers\etc\hosts”, and open the hosts file in notepad. Now you can change the file according to your needs and requirement.
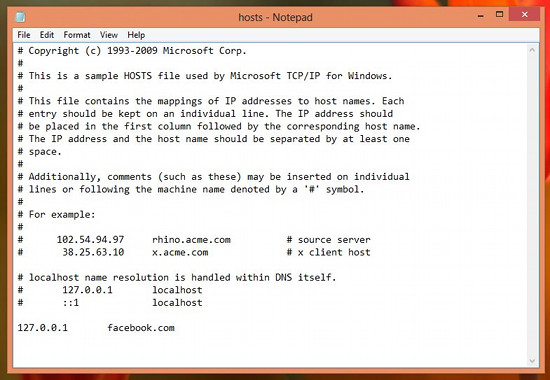
- Here, as an example we are going to block a website by bringing changes in the host file. To do so add 127.0.0.1, followed by a tab and then the name of the website you want to block. Here we are going to block facebook.com. Just edit the host file and put “127.0.0.1 facebook.com” at the end of the file as shown in the screen shot below. Just remember to put a Tab between 127.0.0.1 and the sites address.
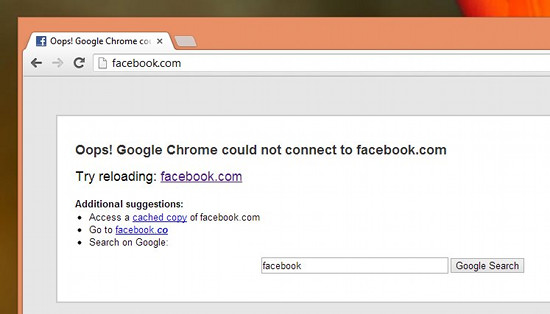
- After you have made the above changes just save the file and your are done with this. You now have successfully blocked this website in windows 8. After you have followed the tutorial the changes are instantaneous and you don’t have to reboot the PC. This can be seen in the screenshot below. Using this method you can change hosts file in Windows 8 and block websites in Windows 8 according to your need.
Also check out this tutorial that will teach you how to shutdown Windows 8 with a single click.

